Home > Host Manual > Billing System > Funds Manager > SSL Certificate Authorities Settings > Configuring Certificate Authorities
Configuring Certificate Authorities
 |
- Before configuration, make sure that you have a GLOBALSIGN partner's account as you have to specify that same user credentials here in configuration. The configuration page has a link that directly takes you to the GLOBALSIGN website, where you can signup for a partner’s account, if you don’t have any.
- Click Click here to signup for a partner’s account, if you don’t have any.
|
To configure certificates authorities:
- Log on to hc9 panel.
- From the left menu click Billing System then Funds Manager.
A drop-down displays.
- Click Configure SSL Certificate Authorities.
The Configure Certificate Authorities page displays.
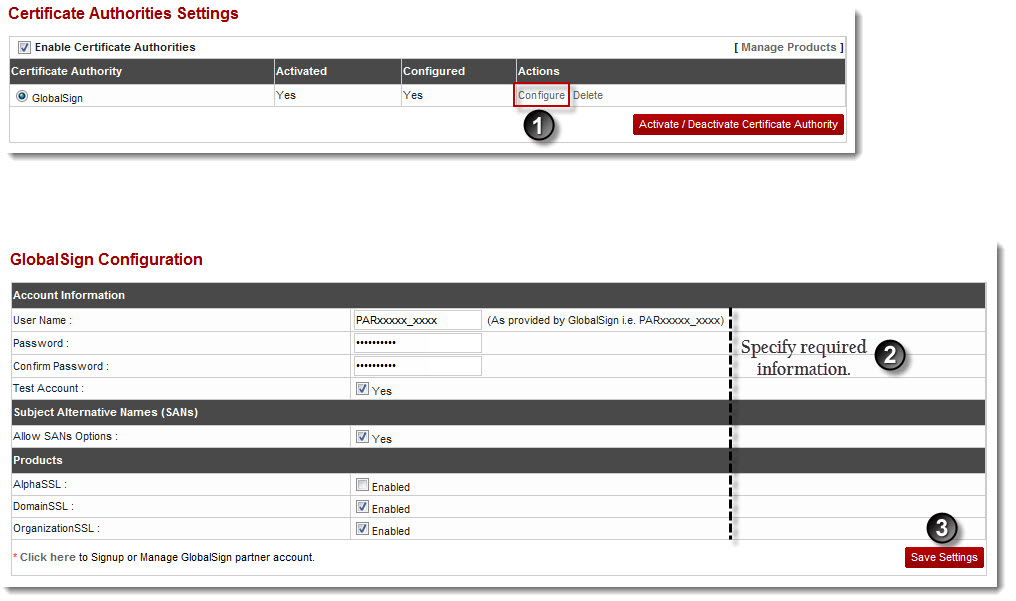
- Click the Enable Certificate Authorities check box.
Certificate Authorities display.
- Under Actions column, click Configure.
The Configure Authority page displays.
- Specify Account Information:
- User Name: Type the name of the user.
- Password: Type Password.
- Confirm Password: Re-type Password.
- Test Account: Select the Yes check box to make if it is a test account.
- Specify Subject Alternative Names (SANs):
- Allow SANs Options: Select the Yes check box to allow SAN's options.

|
These are SSL related options that Host may or may not want to show to Webadmins, when they order for SSL certificates. |
- Specify Products information:
- AlphaSSL: Select the Yes check box to enable AlphaSSL.
- DomainSSL: Select the Yes check box to enable DomainSSL.
- OrganizationSSL: Select the Yes check box to enable OrganizationSSL.
- Click Save Settings.
The GlobalSign Certificate Authority is configured.

See also

