My Websites page is displayed.
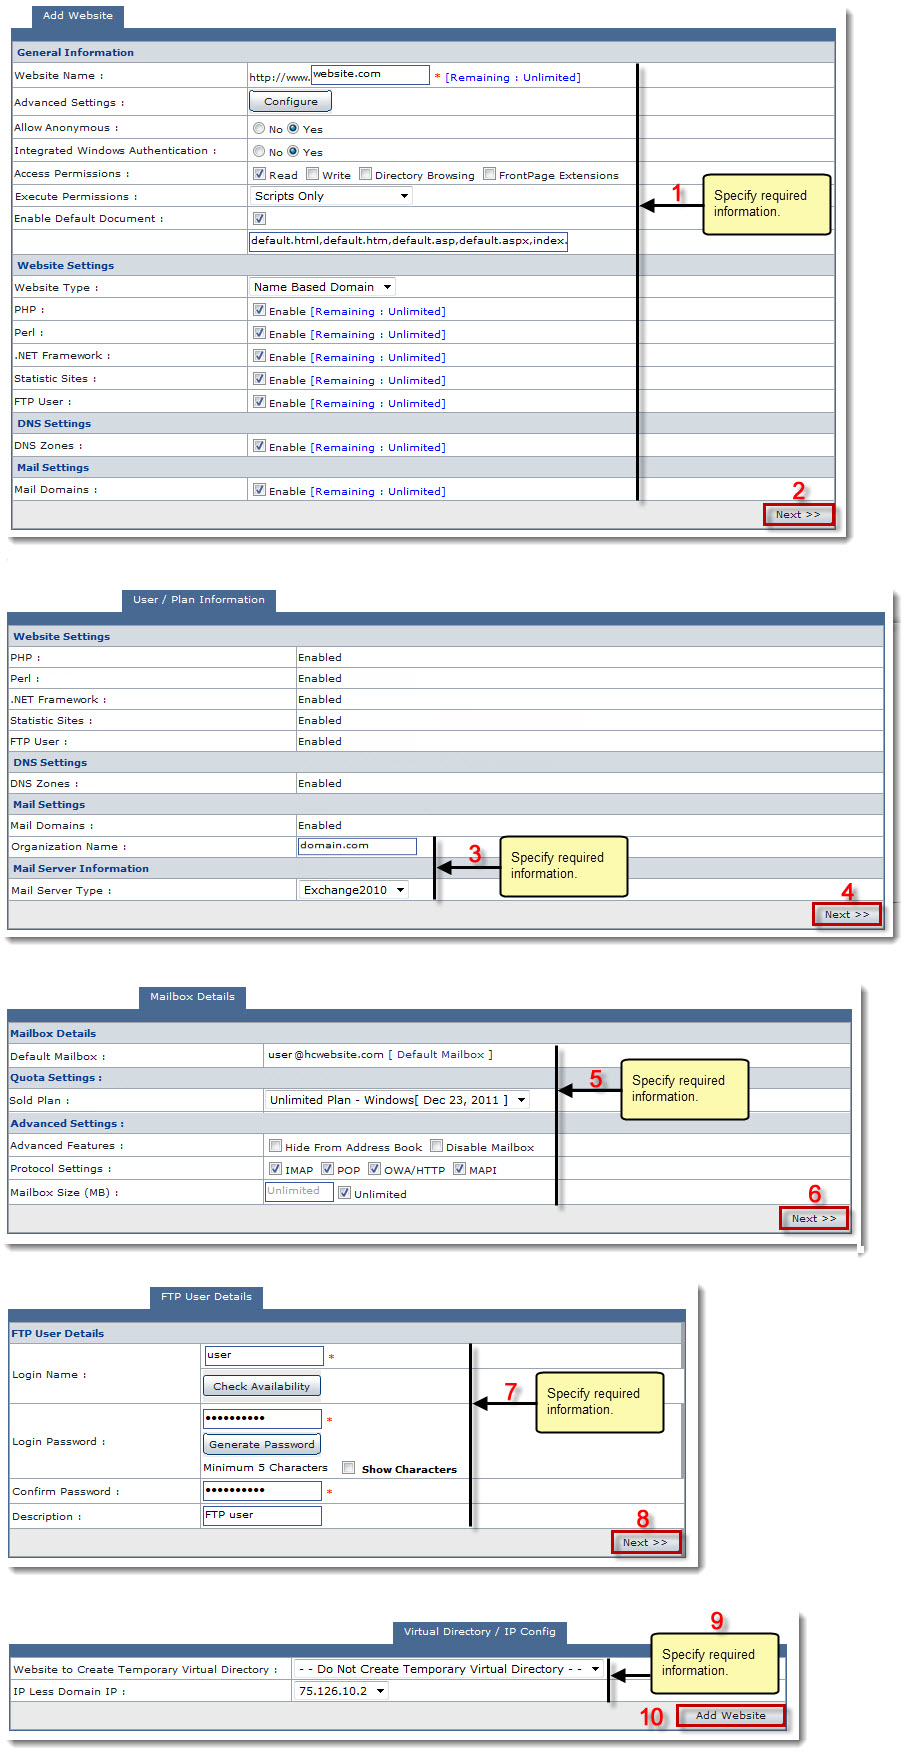
The Add Website page is displayed.
- Website Name: Type name of the website.
- Advanced Settings: Click Configure to specify advance level settings.
- Allow Anonymous: Click any of the given option as required.

Click Yes/No to enable/disable the anonymous access respectively. It allows anyone to access the website without asking for a user name or password. By default anonymous access is ON. - Integrated Windows Authentication: Click any of the given option as required.
Click Yes/No to enable/disable the Integrated Windows Authentication. - Access Permissions: Select any or all of the check boxes as required.
Selecting the Read check box, the sites can only be displayed by the browsers. Selecting the Write check box, the sites can be modified by the browsers. Selecting the Directory Browsing check box, the sites with directory browsing access, displays the directory structure to browsers. Selecting the FrontPage Extensions check box, the sites with FrontPage Extensions are displayed in the browsers. - Execute Permissions: Select required permission from the drop-down list box.
- Enable Default Document: Select the check box to enable the default document like default.html, default.asp etc.
- Allow Anonymous: Click any of the given option as required.
- Website Type: Select the type of website from the drop-down list box.
- PHP: Select the checkbox Enable to enable the respective scripting language for the website.
- Perl: Select the checkbox Enable to enable the respective scripting language for the website.
- .Net Framework: Select the checkbox Enable to enable the .NET framework for the website.
- Statistics Sites: Select the checkbox Enable to enable the statistics for the website.
- FTP User: Select the checkbox Enable to enable FTP User for the website.
- DNS Zones: Select the checkbox Enable to enable the DNS zones for the website.
- Mail Domains: Select the checkbox Enable to enable the mail domains for the website.
The User/Plan Information tab is displayed.
- Mail Server Type: Select mail server from the drop-down list box.

If you selected Mail Server Type as Exchange Server, then select Exchange Mailbox Database from the drop-down list box.
The Mailbox Details tab is displayed.
|
Click [Default Mailbox] to use default mailbox settings. |
- Sold Plan: Select sold plan from the drop-down list box.
- Advanced Features: Specify advance features for the mailbox.
- Hide From Address Book: Select the check box to not make it visible in the address book.
- Disable Mailbox: Select the check box to disable the mailbox being added.
- Protocol Settings: Select protocol settings for the mailbox.
- Mailbox Size (MB): Type size of the mailbox.
- Unlimited: Select the check box to set indefinite size limit for the mailbox.
The FTP User Details tab is displayed.
- Login Name: Type name of the FTP User.
- Login Passwrod: Type password of the FTP User.
- Confirm Password: Re-type password.
- Description: Type brief description of the FTP User.
The Virtual Directory/IP Config tab is displayed.
- Website to Create Temporary Virtual Directory: Select website from the drop-down list box.
- IP Less Domain IP: Select IP less domain IP from the drop-down list box.
The website is added.