A drop-down displays.
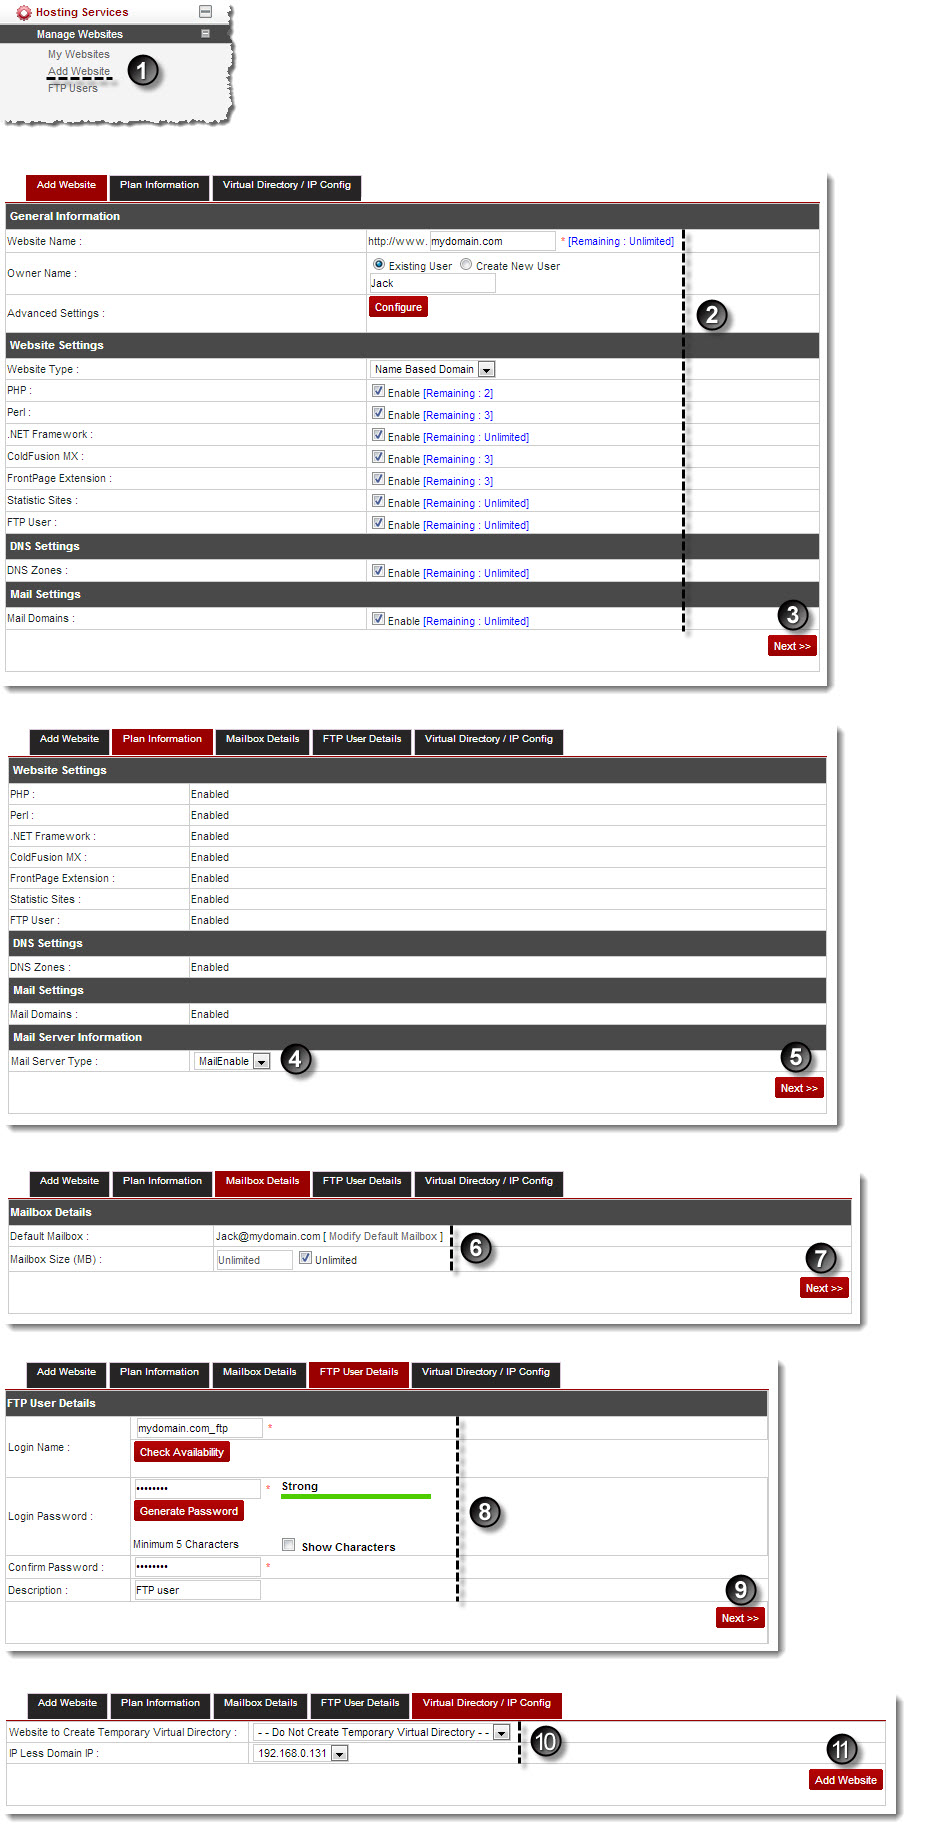
The Add Website page displays.
- Website Name: Type name of the website.
- Owner Name: Select name of the owner from the drop-down list box.
- Advanced Settings: Click Configure to specify advance level settings.
- Allow Anonymous: Click any of the given option as required.

Click Yes/No to enable/disable the anonymous access respectively. It allows anyone to access the website without asking for a user name or password. By default anonymous access is ON. - Integrated Windows Authentication: Click any of the given option as required.
Click Yes/No to enable/disable the Integrated Windows Authentication. - Access Permissions: Select any or all of the check boxes as required.
- If you select the Read check box, the sites can only be displayed by the browsers.
- If you select the Write check box, the sites can be modified by the browsers.
- If you select the Directory Browsing check box, the sites with directory browsing access, displays the directory structure to browsers.
- If you select the FrontPage Extensions check box, the sites with FrontPage Extensions are displayed in the browsers.
- Execute Permissions: Select required permission from the drop-down list box.
- Enable Default Document: Select the check box to enable the default document like default.html, default.asp etc.
- Allow Anonymous: Click any of the given option as required.
- Website Type: Select the type of website from the drop-down list box.
- PHP: Select the checkbox Enable to enable the respective scripting language for the website.
- Perl: Select the checkbox Enable to enable the respective scripting language for the website.
- .Net Framework: Select the checkbox Enable to enable the .NET framework for the website.
- Statistics Sites: Select the checkbox Enable to enable the statistics for the website.
- FTP User: Select the checkbox Enable to enable FTP User for the website.
- DNS Zones: Select the checkbox Enable to enable the DNS zones for the website.
- Mail Domains: Select the checkbox Enable to enable the mail domains for the website.
The User/Plan Information tab is displayed.
|
In case Violated is written in front of any plan item, you can remove this violation via Quota Violation Removal Options. You can either sell Plan or Add-On to solve the violation problem. |
- Login Name: Type user name.
- Login Password: Type password.
- Click Generate Password to automatically generate password.
- Click Show Characters check box to view password characters.
- Confirm Password: Re-type password.
- First Name: Type first name.
- Last Name: Type last name.
- Email Address: Type email address of the user.
- Description: Type brief description.
- Sell This Plan: Select plan from the drop-down list box.
- Mail Server Type: Select mail server from the drop-down list box.
If you selected Mail Server Type as Exchange Server, then select Exchange Mailbox Database from the drop-down list box.
The Mailbox Details tab is displayed.
- Default Mailbox: Type mailbox name.
Click [Default Mailbox] to use default mailbox settings.
- Password: Type password.
- Confirm Password: Re-type password.
- Advanced Features: Specify advance features for the mailbox.
- Hide From Address Book: Select the check box to not make it visible in the address book.
- Disable Mailbox: Select the check box to disable the mailbox being added.
- Protocol Settings: Select protocol settings for the mailbox.
- Mailbox Size (MB): Type size of the mailbox.
- Unlimited: Select the check box to set indefinite size limit for the mailbox.
The FTP User Details tab is displayed.
- Login Name: Type name of the FTP User.
- Login Passwrod: Type password of the FTP User.
- Confirm Password: Re-type password.
- Description: Type brief description of the FTP User.
The Virtual Directory/IP Config tab is displayed.
- Website to Create Temporary Virtual Directory: Select website from the drop-down list box.
- IP Less Domain IP: Select IP less domain IP from the drop-down list box.
The website is added.