Home > Reseller Manual > Panel Configuration > Auto Signup Configuration > Managing Auto Signup Themes > Customizing Auto Signup Themes
Customizing Auto Signup Themes
 |
Prior to customize any theme, you must set it as default. Customizing Auto Signup Themes includes:
- Customizing Header and Footer
- Customizing Styles and Formatting
- Customizing Contents and Languages
- Customizing Dynamic Controls
|
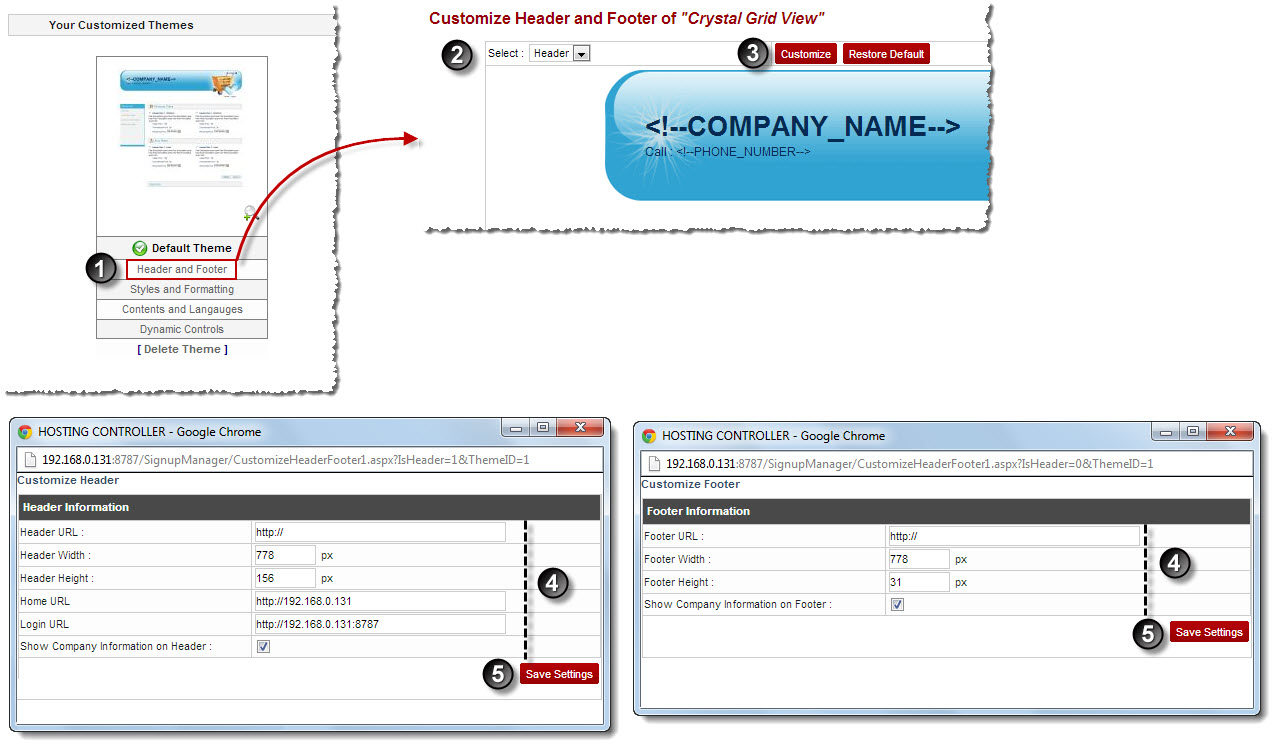
To customize header and footer:
- Log on to hc9 panel.
- From the left menu click Panel Configuration, and then Auto Signup Configuration.
A drop-down displays.
- Click Auto Signup Themes.
The Auto Signup Themes page displays.
- Click Header and Footer of your default theme.
The Header and Footer page is displayed.
- Select required option from the drop-down list box and click Customize.
A dialog box is displayed.
- Specify following information (in case of Header):
- Header URL: Type URL for header.
- Header Width: Type width for header.
- Header Height: Type height for header.
- Home URL: Type home page URL for header.
- Login URL: Type login page URL for header.
- Show Company Information on Header: Select to make company information visible on the header.
- Specify following information (in case of Footer):
- Footer URL: Type URL for footer.
- Footer Width: Type width for footer.
- Footer Height: Type height for footer.
- Show Company Information on Footer: Select to make company information visible on the footer.
- Click Save Settings.
The Header and Footer are customized.
|
- To apply default settings to the selected option in the drop down list box, click Restore Default.
- To apply default settings to both the header and footer, click Restore Default Header and Footer.
|
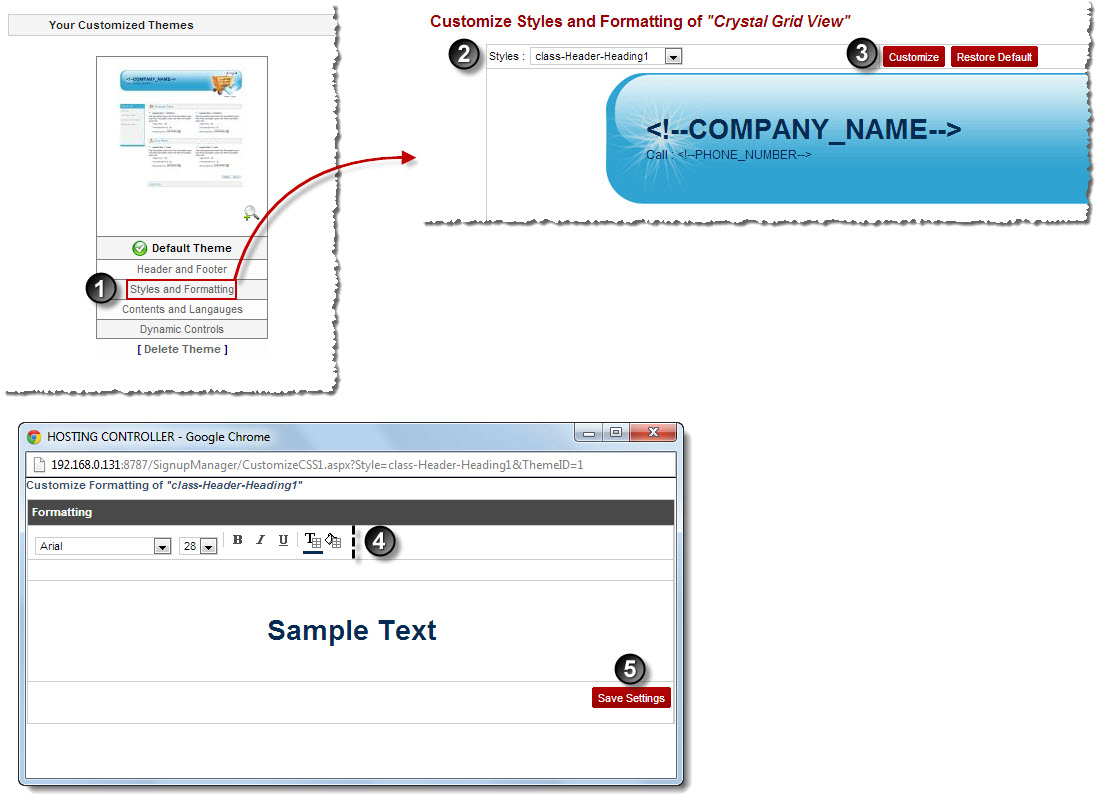
To customize styles and formatting:
- Log on to hc9 panel.
- From the left menu click Panel Configuration, and then Auto Signup Configuration.
A drop-down displays.
- Click Auto Signup Themes.
The Auto Signup Themes page displays.
- Click Styles and Formatting of your default theme.
The Styles and Formatting page is displayed.
- Select required style from the drop-down list box and click Customize.
A dialog box is displayed.
- Format the selected style as required and click Save Settings.
The selected style is formatted.
|
- To apply default settings to the selected style in the drop down list box, click Restore Default.
- To apply default settings to the entire style sheet, click Restore Default Style Sheet.
|
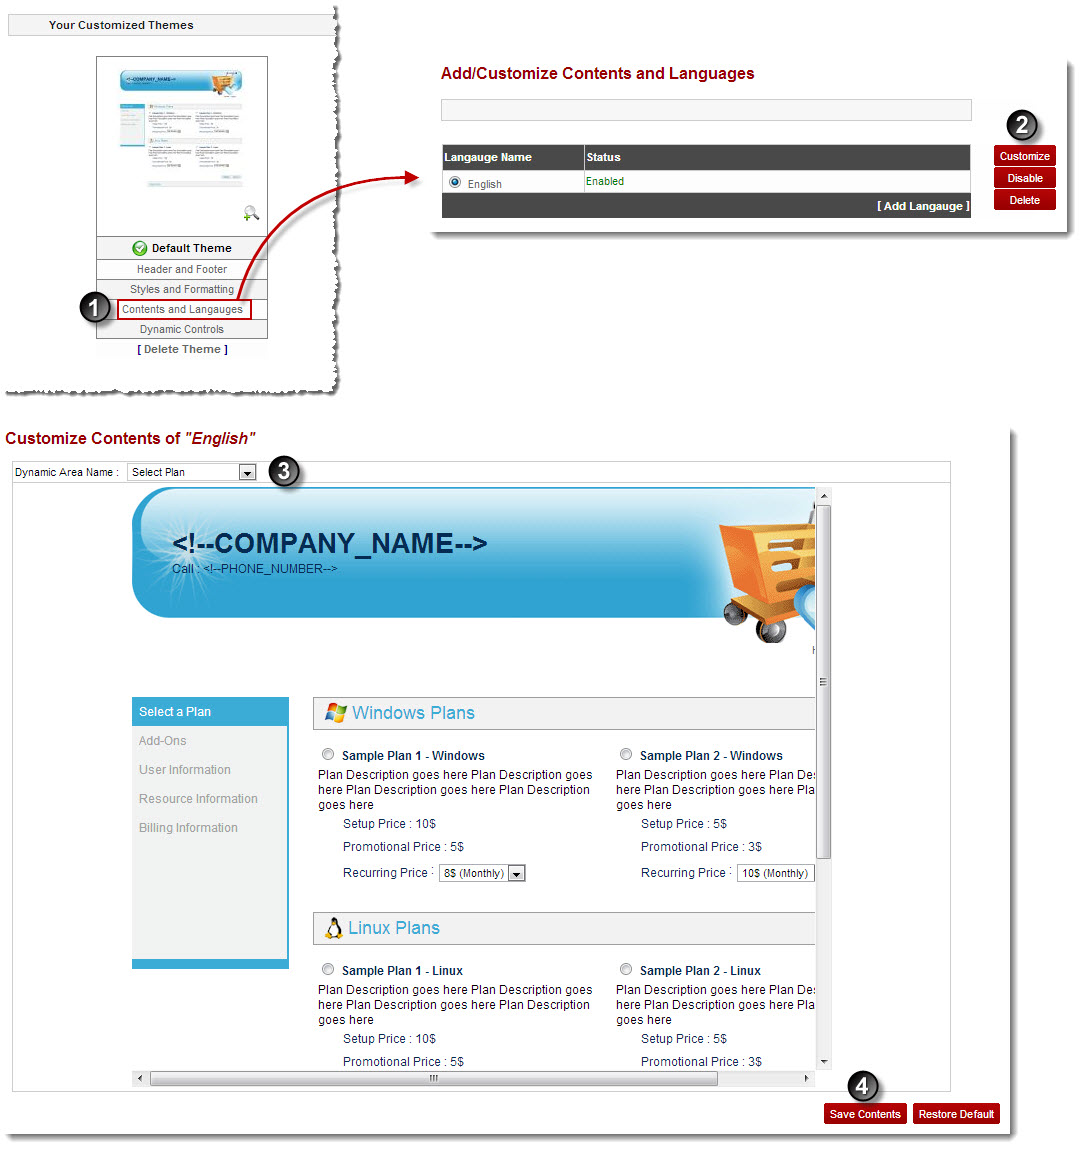
To customize contents and languages:
- Log on to hc9 panel.
- From the left menu click Panel Configuration, and then Auto Signup Configuration.
A drop-down displays.
- Click Auto Signup Themes.
The Auto Signup Themes page displays.
- Click Contents and Languages of your default theme.
The Contents and Languages page is displayed.
|
To add another language:
- Click Add Language.
Some options are displayed.
- Specify following information:
- Language Name: Type name of the language to be added.
- Language Descriptive Name: Type some descriptive name for the language.
- Click Next.
The Add Contents page is displayed.
- Click Dynamic Area Name arrow and select required area to add the content in the selected language.
- Click Save Contents.
The new language is added.
|
|
To disable any language, select the language under Language Name column and click Disable.
|
- Under the Language Name column, select language and then click Customize.
The Customize Contents page is displayed.
- Specify the following information:
- Dynamic Area Name: Select required area from the drop-down list box to add the content in the selected language.
| The available options for Dynamic Area Name are: |
 |
User Information |
|
Domain Information |
|
Billing Information |
|
Auto Signup Result |
|
Select Plan |
- Click Save Contents.
The contents for the selected language are customized.
| |
To apply default settings to the contents, click Restore Defaults.
|
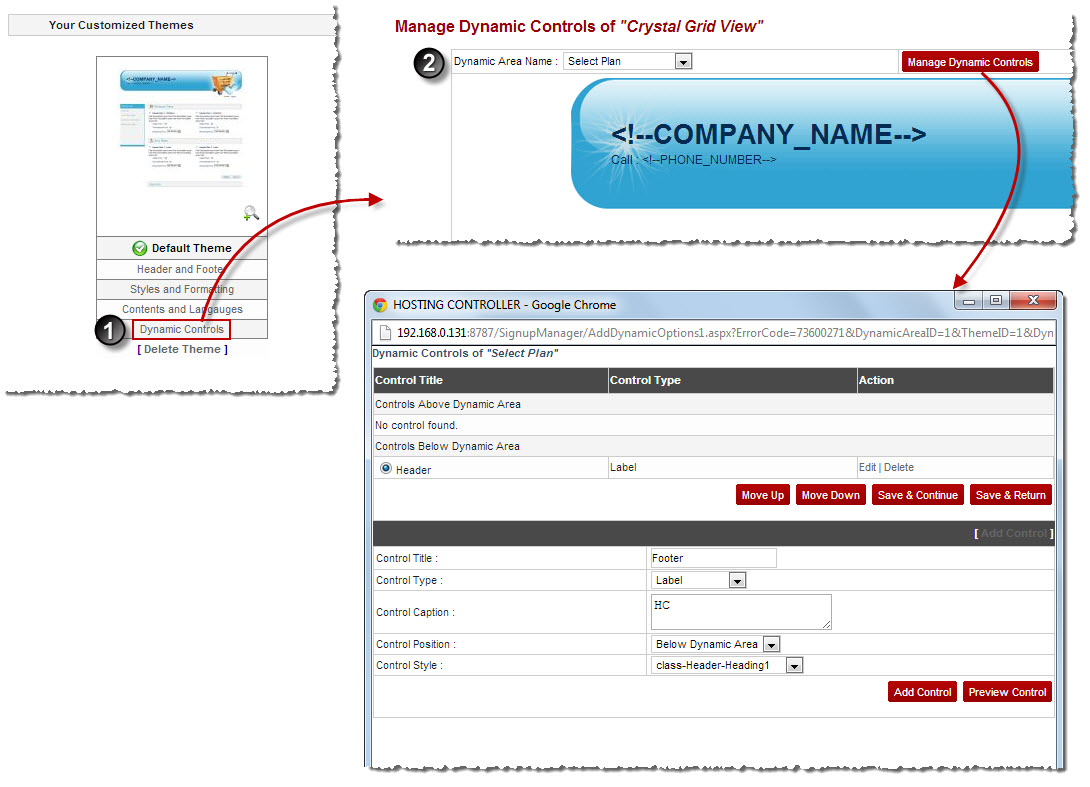
To customize dynamic controls:
- Log on to hc9 panel.
- From the left menu click Panel Configuration, and then Auto Signup Configuration.
A drop-down displays.
- Click Auto Signup Themes.
The Auto Signup Themes page displays.
- Click Dynamic Controls of your default theme.
The Dynamic Controls page is displayed.
- Specify the following information:
- Dynamic Area Name: Select required area from the drop-down list box to customize dynamic controls for that area.
| The available options for Dynamic Area Name are: |
|
User Information |
|
Domain Information |
|
Billing Information |
|
Select Plan |
- Click Manage Dynamic Controls.
The Dynamic Controls page for the selected area is displayed.
|
Control Title: It is the title of the control. |
|
Control Type: It is the type of the control. |
|
Action: These are the allowed operations on the control. |
|
To add another control:
- Click Add Control.
Few options are displayed.
- Specify the following information:
- Control Title: Type name of the control.
- Control Type: Select type of the control from the drop-down list box.
Available options for Control Type are:
-- Label
-- Hyperlink
-- Check box
-- Drop-Down List
-- Image Link
- Control Caption: Type the text to be placed on/with the control.
- Control Position: Select the position of the control from the drop-down list box.
Available Options for Control Position are:
-- Below Dynamic Area
-- Above Dynamic Area
-
Control Style: Select style for the control from the drop-down list box.
- Click Add Control.
The Control is added.
|
|
- To move the controls upwards/downwards, select the control and then click Move Up/Move Down respectively.
- To modify controls, select the control and then click Edit under the Action column.
- To remove controls, select the control and then click Delete under the Action column.
|
- Click Save & Return.
The Dynamic Controls are customized.
|
To continue customizing the controls, click Save & Continue.
|
See also