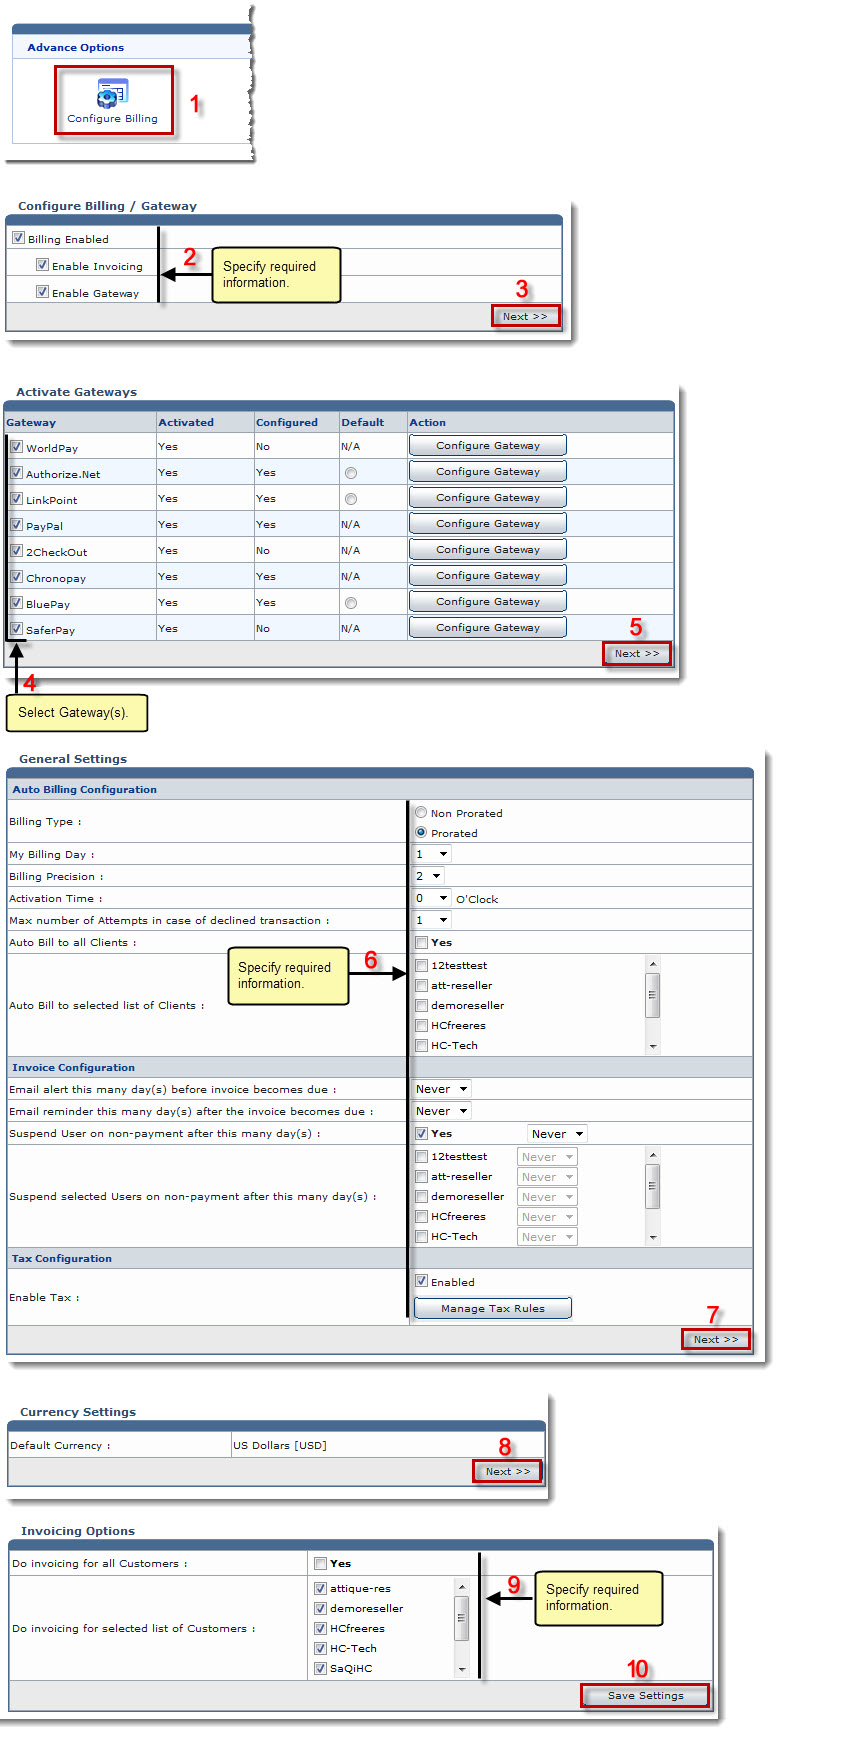
The Billing System Options page is displayed.
The Configure Billing page is displayed.
| Billing configuration includes following sub steps: |
| Enable Invoicing |
| Enable Gateway |
 |
Selection of at least one category of HC billing is mandatory. |
The Activate Gateways page is displayed.
 |
The Gateway activation page is displayed only if Enable Gateway check box was selected in the previous step. |
The Billing Configuration page is displayed.
- Billing Type: Click the type of billing as required.
The available options for Billing Type are: 
Non Prorated: If selected, the recurring billing is done on the date of signup. This means that if a customer has signed-up a $5/month plan on May 14th then the next billing will be on June 14th. 
Prorated: If selected, the billing system charges a complete month and then first recurring is prorated. It is a common billing method in hosting industry. 
For Example:
Hosting Plan: $10/month
Billing Day: 2nd of month
Signup Date: 15 MayNow new account will be charged $10 for 15May-15June. On 15 June user will be charged $5 for 15June-2July (prorated) and onward billing will be from 2nd to 2nd each month.
- My Billing Day: Select day of billing from the drop-down list box as required.

The My Billing Day option is available only in case of Prorated Billing. - Billing Precision: Select required precision for billing from the drop-down list box.

This billing precision is used throughout the billing transactions. - Activation Time: Select time of billing activation from the drop-down list box.

The billing system is activated once in a day to generate invoices, perform credit card charging, send reminder/alerts, suspend unpaid accounts, etc. - Max number of Attempts in case of Declined Transaction: Select maximum number of attempts from the drop-down list box.

Some Gateways charge extra for each declined transaction. Set the maximum number of attempts that should be made to charge the credit card. If ‘3’ is selected then billing system attempts to charge three times in three days. That is one try in each 24 hours. After three unsuccessful attempts it turns off Auto Billing for this specific user. - Auto Bill to all Clients: Select Yes check box to perform auto billing for all the clients.
- Auto Bill to selected list of Clients: Select check boxes of the required clients to perform auto billing for.
- Email alert this many day(s) before invoice becomes due: Select the number of days from the drop-down list.

This option is used to send an impending payment alert email to customers before the invoice becomes due. This is very helpful for on time payments as customers are notified well in time. - Email reminder this many day(s) after the invoice becomes due: Select number of days from the drop-down list.

It is used to send a reminder email if client has failed to pay the invoice.
- Suspend User on non-payment after this many day(s): Select the Yes check box to suspend plan of all the clients and number of days from the drop-down list.

Billing system stops all the websites in unpaid plan after specified number of days for all clients. The day count starts from the day of invoice generation. - Suspend Selected Users on non-payment after this many day(s): Select check boxes of the required clients and number of days from the drop-down list.

Billing system stops the selected websites in unpaid plan after specified number of days for selected clients. The day count starts from the day of invoice generation.
- Enable Tax: Select the Enabled check box to enable tax.

Click Manage Tax Rules to configure tax rules:
The Currency Settings page is displayed.
The Invoicing Options page is displayed.
 |
If you do not want to do invoicing for all the customers, leave this check box unselected. |
The Billing is configured.
