Home > Host Manual > Panel Configuration > Migration > Importing Virtual Machines
Importing Virtual Machines
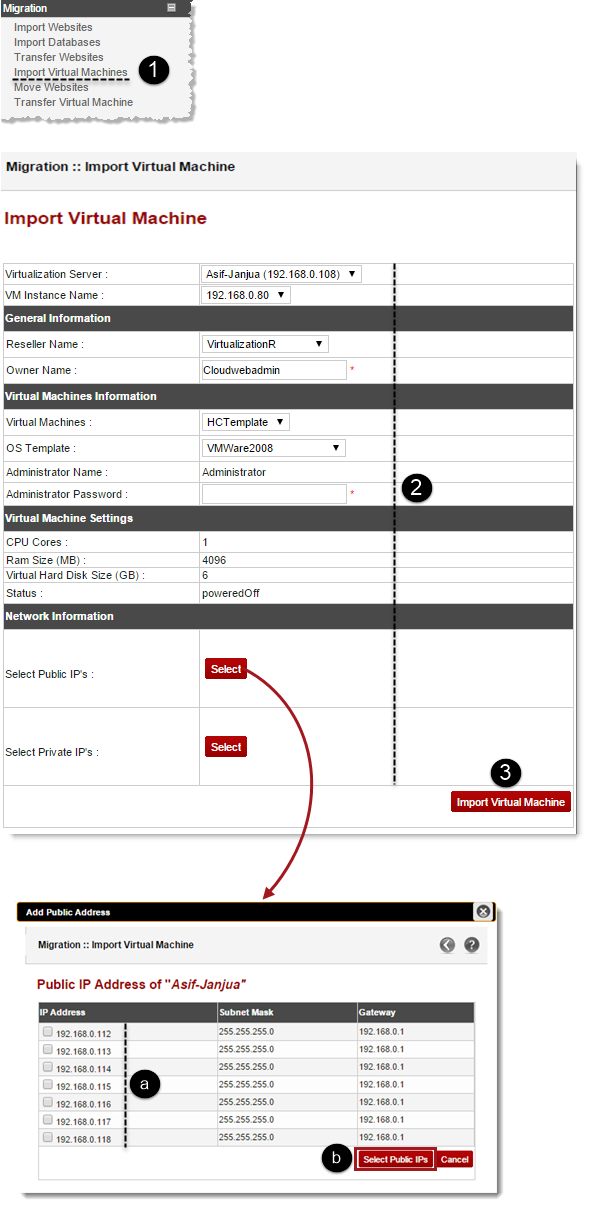
To import virtual machine(s):
- Log on to hc9 panel.
- From the left menu click Panel Configuration, and then Migration.
A drop-down displays.
- Click Import Virtual Machines.
The Import Virtual Mchines page displays.
- Select Virtualization Server from the drop-down list box.

|
This is the server carrying the HC installation. In case of Hyper-V HC is directly installed on the Hyper-V physical host whereas in the case of VMWare it’s installed on a separate Windows machine. |
- Select VM Instance Name arrow and select server from the drop-down list box.
|
This is the Hyper-V physical host or the ESXI host in case of VMWare. |
|
The machine carrying the HC installation will be different from the ESXI host in case of VMWare. |
- Specify General Information:
- Reseller Name: Select name of the reseller from the drop-down list box.
- Owner Name: Select name of the Tenant Admin (End User) from the drop-down list box.
- Specify Virtual Machines Information:
- Virtual Machines: Select virtual machine from the drop-down list box. The VM can be selected from a list of available VMs present on the given Hyper-V physical host/ESXI host.
- OS Template: Select OS template from the drop-down list box.

|
Administrator Name displays name of the VM administrator. |
- Administrator Password: Type password for administrator.
|
In case of Linux, provide the root password. |
|
Hosting Controller automatically pulls Virtual Machine Settings. |
- Specify Network Information:
- Select Public IPs: Click Select to choose public IP.
|
As HC does not automatically associate IPs to the VM during the import, these IPs first need to be added to HC at this location Virtualization Module Configuration >> Public IP Addresses. Then they may be bound to the VM.
|
- Select Private IPs: Click Select to choose public IP.
|
As HC does not automatically associate IPs to the
VM during the import, these IPs first need to be added to HC at this
location Virtualization Module Configuration >> Private IP
Addresses. Then they may be bound to the VM. |
- Click Import Website.
The website is imported.
See also