Home > Host Manual > General > Server Manager > Adding a Server > Linux Family > Adding a Linux DNS Server
Adding a Linux DNS Server
To add a linux DNS server:
- Log on to HC panel.
- From the left menu click General, and then Server Manager.
The Server Manager page is displayed.
- Click Add Server.
The Add Server page is displayed.
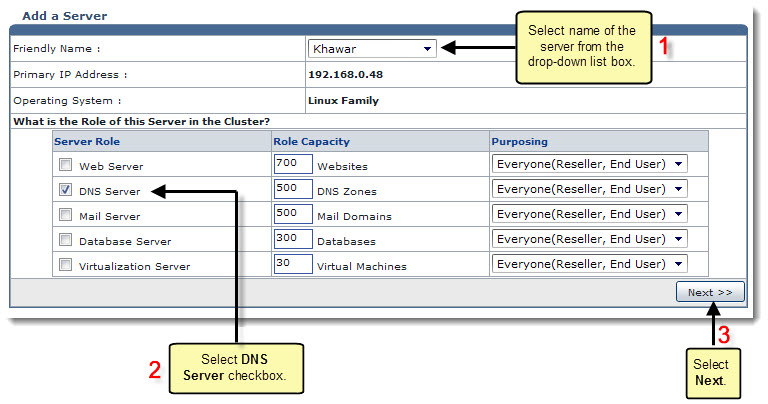
- Click the Friendly Name arrow and select the required server from the drop-down list box.
 |
The Primary IP Address shows the IP address of the server to be added.
|
 |
The Operating System shows the platform (Windows/Linux) of the server to be added.
|
- Under Server Role column, select the DNS Server check box.
 |
Every server can have one or more role(s) in the cluster. These roles need to be set every time a new server is added to the cluster.
|
- Under Role Capacity column, type the number of DNS Zones supported by the server.
- Under Purposing column, click the arrow and select the end user for the server from the drop-down list box.
 |
- The server role added in the cluster can be used either dedicatedly for a Reseller or for shared hosting. A role dedicated to a Reseller can not be used for any other user.
- In case of only one server in the cluster, choose Everyone.
- In case of more than one server, choose ResellerOnly to dedicate server to particular Reseller.
|
- Click Next.
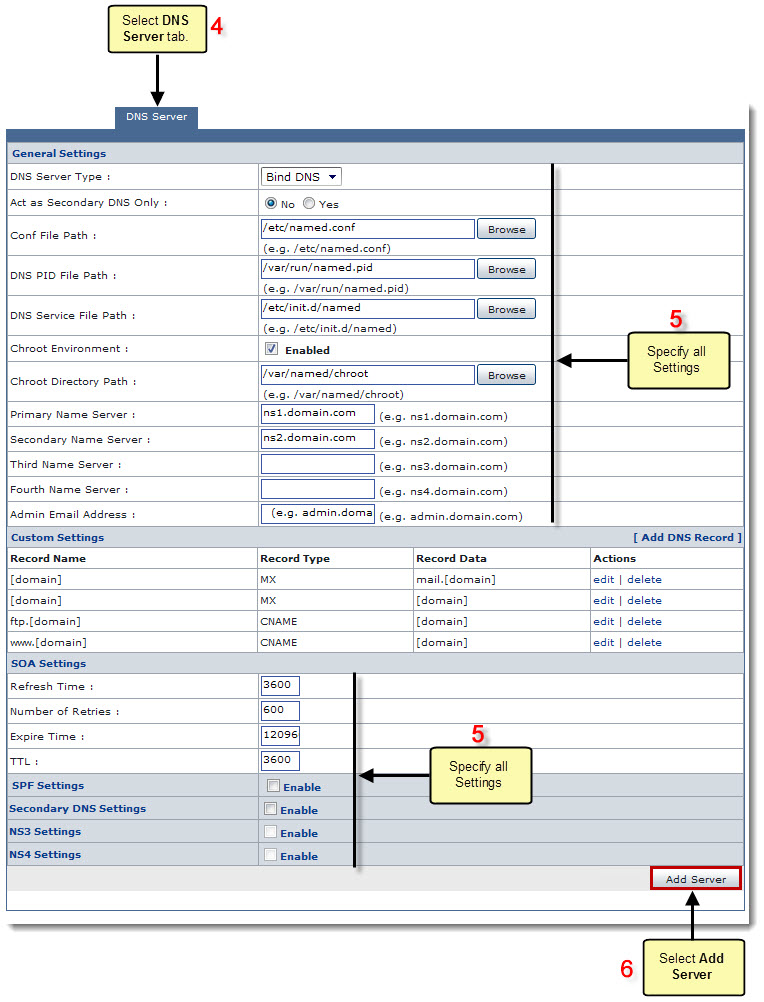
The DNS Server Configurations page is displayed.
|
To provide all the paths, click Browse and enter the required path(s).
|
- Specify the General Settings:
- DNS Server Type: Click the arrow and select the type of DNS server from the drop-down list box.
- Act as Secondary DNS Only: Select Yes to make this server only the Secondary DNS Server. Otherwise, select No.
- CONF File Path: Enter path for the CONF File.
- DNS PID File Path: Enter path for the DNS PID File.
- DNS Service File Path: Enter path for the DNS Service File.
- Primary Name Server: Type name of the primary server.
 |
For Example: server1.hostingcontroller.com
|
- Secondary Name Server: Type name of the secondary server.
 |
For Example: server2.hostingcontroller.com
|
- Third Name Server: Type name of the third server.
 |
For Example: server3.hostingcontroller.com
|
- Fourth Name Server: Type name of the fourth server.
 |
For Example: server4.hostingcontroller.com
|
- Admin Email Address: Type the email address of the Administrator.
 |
For Example: administrator.hostingcontroller.com
|
 |
The Custom Settings shows all DNS records of the cluster.
|
 |
- To modify DNS record, click Edit under Actions column.
- To remove DNS record, click Delete under Actions column.
|
 |
- To add a DNS record, click Add DNS Record.
Some fields are displayed.
- Specify the following information:
- Record Type: Click the arrow and select the type of the DNS record from the drop-down list box.
- Record Name: Type name of the DNS record.
- Record Data: Type data of the DNS record.
- Click Add Record.
|
- Specify SOA Settings:
 |
SOA Settings specify authoritative information about a DNS zone, including the primary name server, the email of the domain administrator, the domain serial number, and several timers relating to refreshing the zone.
|
- Refresh Time: Type the time to refresh SOA Settings.
- Number of Retries: Type the number of seconds, after which a retry is made to refresh the SOA Settings.
- Expire Time: Type the time of expiry.
- TTL: Type the time period for TTL.
 |
The units used for TTL (Time to Live) are seconds. A common TTL value for DNS is 86400 seconds, which is 24 hours. A TTL value of 86400 would mean that if a DNS record was changed, DNS servers around the world could still be showing the old value from their cache for up to 24 hours after the change.
|
- Specify SPF Settings:
 |
SPF (Sender Policy Framework) is used to stop spam from being sent using unauthorized domain names. It can only stop the pammer for the From field in the e-mail and not from sending e-mails from any of its member domain.
|
- SPF Settings: Select the Enable check box to apply SPF Settings on the server.
- SPF Record: Type the SPF information.
 |
The domain which is sending emails must have an established SPF record entry in DNS. Its default value is automatically given but you can change this value if required.
|
- Specify Secondary DNS Settings:
- Secondary DNS Settings: Select the Enable check box to apply Secondary DNS Settings on the server.
- Secondary DNS Server: Click the arrow and select the Secondary DNS Server from the drop-down list box.
- Specify NS3 Settings:
- NS3 Settings: Select the Enable check box to apply NS3 Settings on the server.
- Secondary DNS Server: Click the arrow and select the Secondary DNS Server from the drop-down list box.
- Specify NS4 Settings:
- NS4 Settings: Select the Enable check box to apply NS4 Settings on the server.
- Secondary DNS Server: Click the arrow and select the Secondary DNS Server from the drop-down list box.
- Click Add Server.
A Linux DNS Server is added.


See also


