The Tools Options page is displayed.
The Exchange Enabled Organizations page is displayed.
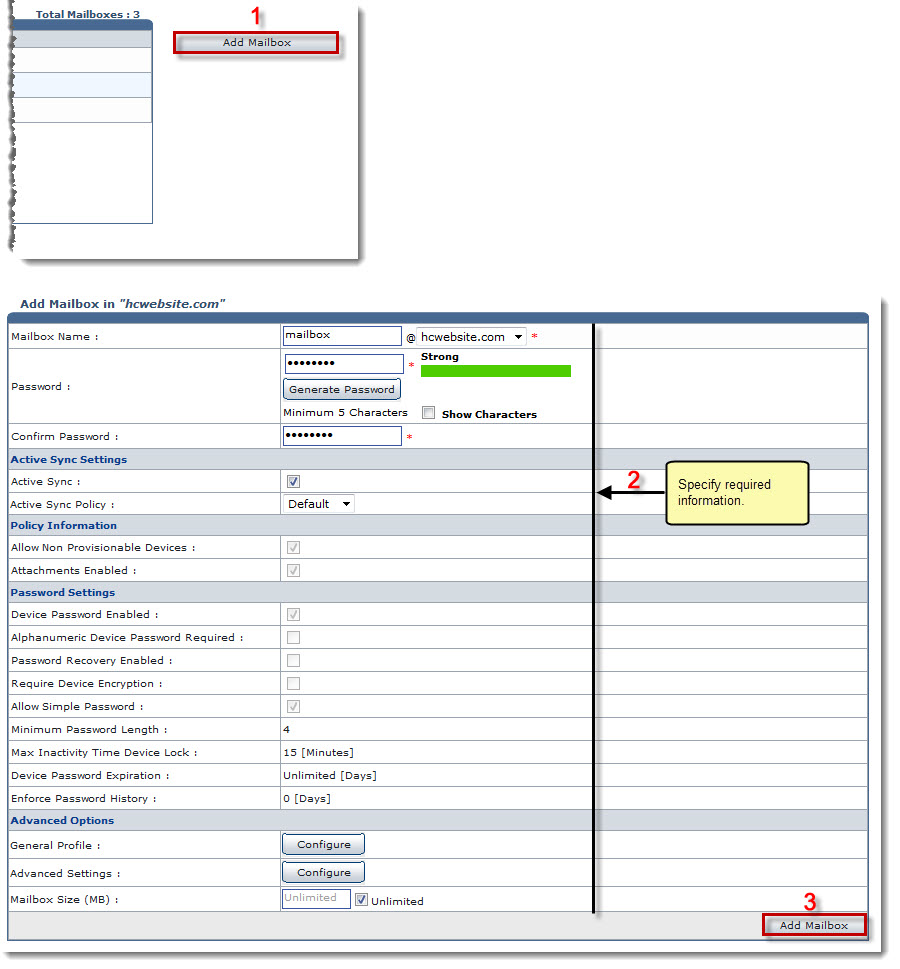
The Mailboxes page is displayed.
The Add Mailbox page is displayed.
- Mailbox Name: Select name of the mailbox from the drop-down list box.
- Password: Type password.

- Click Generate Password to automatically generate password.
- Click Show Characters check box to view the actual characters of the password.
- Confirm Password: Re-type password.
- Active Sync: Select the check box to apply Active Sync settings.
- Select Active Sync Policy from the drop-down list box.
ActiveSync Settings, Policy Information and Password Settings can only be configured at host level. A reseller/webadmin can only view these settings. The Policy Information shows following information: 
Allow Non Provisionable Devices: It allows non provisionable devices if enabled. Attachments Enabled: It allows attachments for the mailbox to be added if enabled. Non-Provisionable Devices are those that do not support new policies/features. The Password Settings shows following information: Device Password Enabled: It allows password for the device if enabled. Alphanumeric Device Password Required: It allows alphanumeric password for the device if enabled. Password Recovery Enabled: It allows password recovery if enabled. Require Device Encryption: It allows encryption for the device if enabled. Allow Simple Password: It allows simple password for the device if enabled. Minimum Password Length: It is the minimum length of the password that can be set for the device. Max Inactivity Time Device Lock: It is the maximum time for a device to be locked in case of inactive state. On any further activity, it prompts for user name & password. Device Password Expiration: It is the number of days that shows expiry date for device password if any. Enforce Password History: It is the password history that shows number of unique passwords that are associated with a user account.
- First Name: Type first name of the mailbox owner.
- Initials: Type initials of the mailbox owner.
- Last Name: Type last name of the mailbox owner.
- Display Name: Type display/screen name of the mailbox owner.
- Office Location: Type office location of the mailbox owner.
- Address: Type the postal address of the mailbox owner.
- City: Type city of the mailbox owner.
- Country: Select country of the mailbox owner from the drop-down list box.
- State: Select state of the mailbox owner from the drop-down list box.
- Zip Code: Type zip code.
- Job Title: Type job title of the mailbox owner.
- Company: Type name of the company of the mailbox owner.
- Department: Type department name of the mailbox owner.
- Business Phone: Type phone number of the mailbox owner.
- Fax: Type fax number of the mailbox owner.
- Home Phone: Type residential phone number of the mailbox owner.
- Mobile Phone: Type cell number of the mailbox owner.
- Web Page: Type web page address of the mailbox owner.
- Notes: Type brief description/notes about the mailbox owner.
- Advance Features: Select options as per requirements.
Hide From Address Book: Select to conceal the mailbox (to be added) to appear in the Address Book. - Protocol Settings: Select none/any one or more/all of the protocols as required.
- Mailbox Size (MB): Type size of the mailbox to be added in MBs as required or select the Unlimited check box for indefinite size of the Mailbox.
- Outgoing Message Size Limit: Type maximum size limit for the outgoing messages.
- Incoming Message Size Limit: Type maximum size limit for the incoming messages.
The Mailbox is added.