Home > Host Manual > Billing System > Manage Billing > Integrating Payment Gateways
Integrating Payment Gateways

|
Integrating payment gateways mean adding a new payment gateway in the HC panel. |
To integrate a payment gateway:
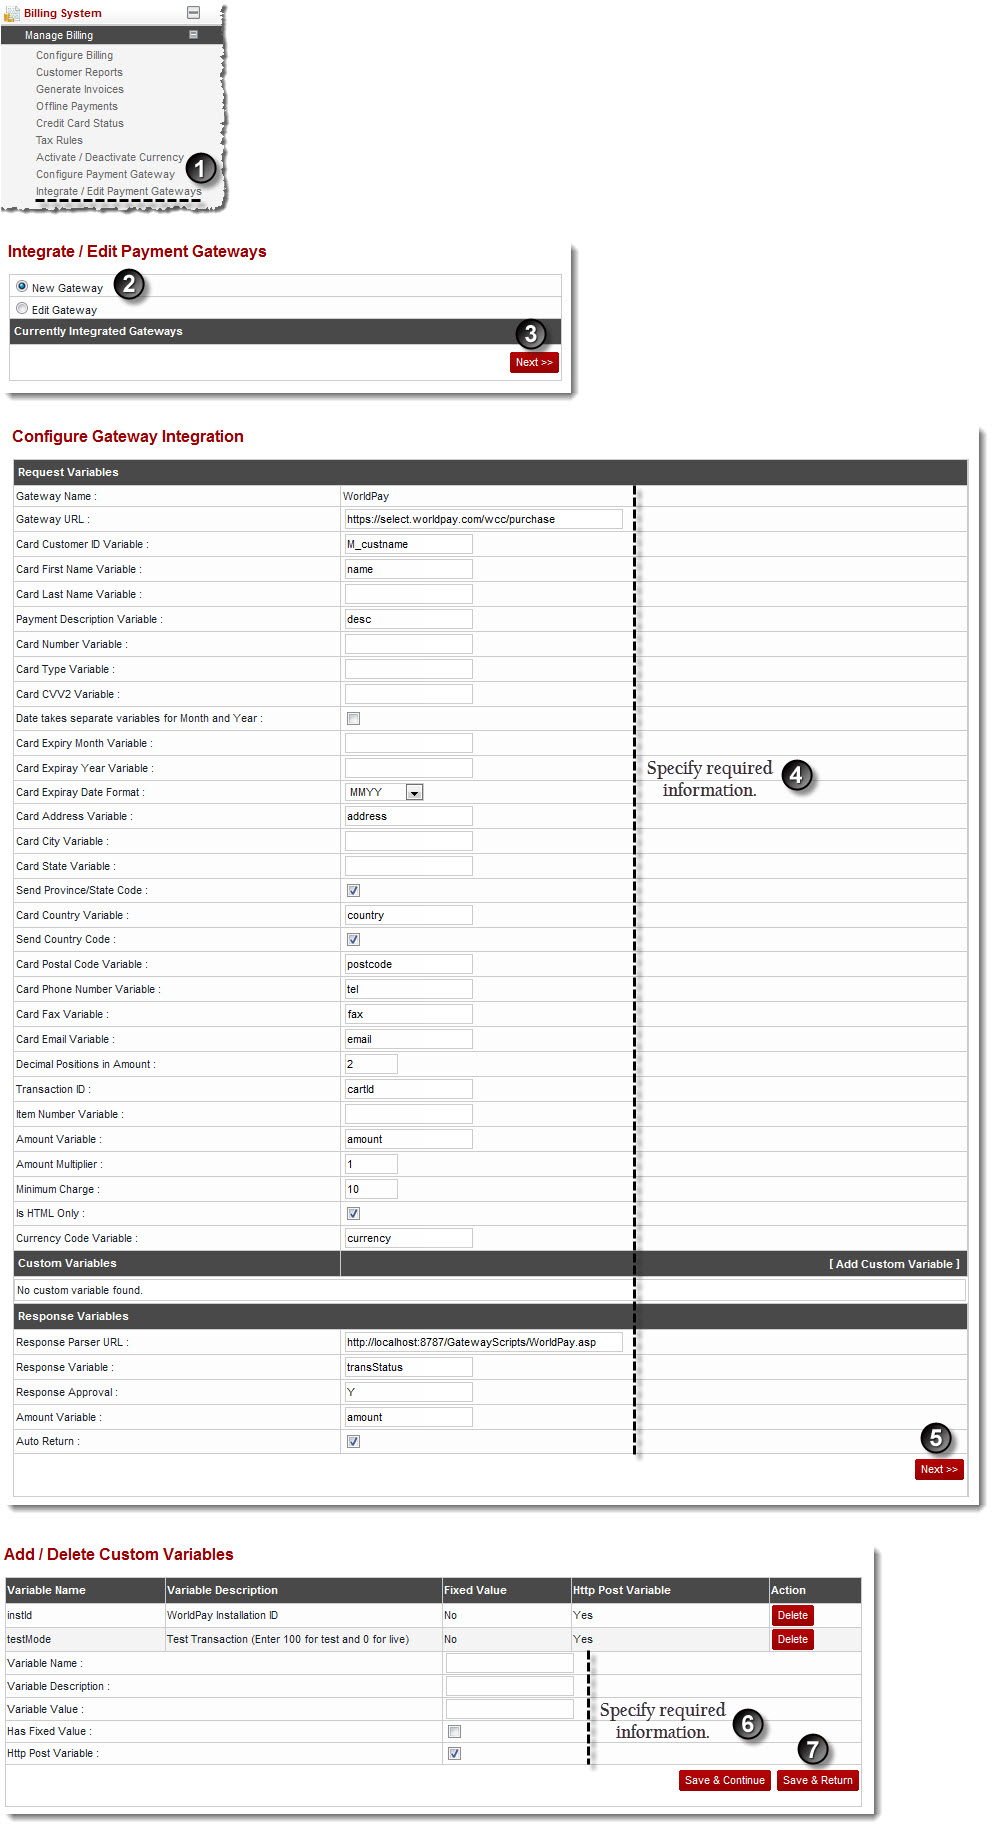
- Log on to hc9 panel.
- From the left menu click Billing System then Manage Billing.
A drop-down displays.
- Click Integrate/Edit Payment Gateways.
The Integrate/Edit Payment Gateway page displays.
- Click New Gateway and then Next.
The Configure Gateway page displays.
- Specify Request Variables:
- Gateway Name: Type name of the gateway.
- Gateway URL: Type URL of the gateway.
- Card Customer ID Variable: Type the variable that gateway takes for ID of customercard.

|
This is the customer ID that the card issuing authority has allocated to you. |
- Card First Name Variable: Type the variable that gateway takes for first name.
- Card Last Name Variable: Type the variable that gateway takes for last name.
- Payment Description Variable: Type the variable that gateway takes for description of payment.
- Card Number Variable: Type the variable that gateway takes for card number.
- Card Type Variable: Type the variable that gateway takes for type of card.
- Card CVV2 Variable: Type the variable that gateway takes for CVV2.

|
CVV2 is the Card Verification Value 2. It is a unique check value generated using a secure cryptographic process that is indent-printed on the back of a Visa card, or provided to a Virtual Account-holder.
For more information refer to businessbankcardprocessing.com/glossary.htm
|
- Date Takes Separate Variables for Month and Year: Select this checkbox if gateway takes two separate variables for month and year.
- Card Expiry Date Variable: Type the variable that gateway takes for expiry date of card.
- Card Expiry Month Variable: Type the variable that gateway takes for expiry month of card.
- Card Expiry Year Variable: Type the variable that gateway takes for expiry year of card.
- Card Expiry Date Format: Select format from the drop-down list box that gateway takes for expiry date.
- Card Address Variable: Type the variable that gateway takes for address.
- Card City Variable: Type the variable that gateway takes for city.
- Card State Variable: Type the variable that gateway takes for state.
- Send Province/State Code: Select the check box to send the province or state code.
- Card Country Variable: Type the variable that gateway takes for country.
- Send Country Code: Select the check box to send the country code.
- Card Postal Code Variable: Type the variable that gateway takes for postal code.
- Card Phone Number Variable: Type the variable that gateway takes for phone number.
- Card Fax Variable: Type the variable that gateway takes for fax number.
- Card Email Variable: Type the variable that gateway takes for email.
- Decimal Positions in Amount: Type the number of digits after the decimal position, required in amount figure.
- Transaction ID: Type the variable that gateway takes for ID of transaction.
- Item Number Variable: Type the variable that gateway takes for number of item.
- Amount Variable: Type the variable that gateway takes for amount.
- Amount Multiplier: Type the number that should be multiplied with the amount.
- Minimum Charge: Type the minimum charges for the transaction that is lesser than the provided amount.

|
This is the minimum amount of the transaction to be charged. If any of the transaction is lesser than the provided amount then gateway charges at least minimum charge. |
- Is HTML Only: Select this check box, if the gateway is HTML based and not API based.
- Currency Code Variable: Type the variable that gateway takes for code of currency.
- Specify Custom Variables:
 |
To add Custom Variables:
- Click Add Custom Variable.
Few options are displayed.
- Type Variable Caption and Variable Name.
- Click Add Variable.
The Custom Variable is added.
|
- Specify Response Variables:
- Response Parser URL: Type the URL for response parser.
- Response Variable: Type the exact variable that gateway takes for response variable.
- Response Approval: Type the exact variable value that gateway gives for approval such as TRUE or FALSE.
- Amount Variable: Type the exact variable that gateway takes for amount variable.
- Auto Return: Select this checkbox to get automatically redirected to the page from where the billing is initiated.

|
This option is for HTML based Gateways. For Example, At the time of signup, on clicking ‘Create Account’, the user is redirected to the Gateway’s website. Once the payment is done, the user is again redirected to the auto signup page if this option is selected. |
- Click Next.
The Configure Custom Variables page is displayed.
- Specify the following information:
- Variable Name: Type name of the variable.
- Variable Description: Type description of the variable.
- Variable Value: Type value of the variable.
- Has Fixed Value: Select this checkbox to make this variable fixed for all users.

|
If the Has Fixed Value check box is not selected, each reseller has to set variable value accordingly. |
- Http Post Variable: Select this checkbox if the variable is posted in HTTP.
-
Click Save & Return.
The Payment Gateway is integrated.

|
To configure more custom variables, click Save & Continue. |

See also


