
| Product Documentation
AD Self Service Portal
Organizations
The organizational Unit (OU) is the smallest unit in the Active Directory system that holds users, groups, and computers. It is a container to which an administrator can assign Group Policy settings or account permissions. It is used to control access to resources and to ensure data segregation. OUs can be nested into other OUs. There can be a root OU and that root OU can have multiple SubOUs beneath it. At every level, the person with administrative control must be capable of managing all the SubOUs beneath him.
As the ADSS portal allows AD users, groups, and contacts to be added through its interface it also allows the creation of OUs under which these objects reside. While adding an organization through the portal admin (global admin) the ADSS portal asks the entity (Active Directory), under which the organization is to be added. However, while adding an organization through the entity admin the ADSS portal merely displays the entity, under which the organization is to be added. This is because the portal admin can have and manage multiple Active Directories while the entity admin can be the manager of only one Active Directory.
Once an organization is created, further objects such as users, groups, contacts, SubOUs, and organizational suffixes can be added to it.
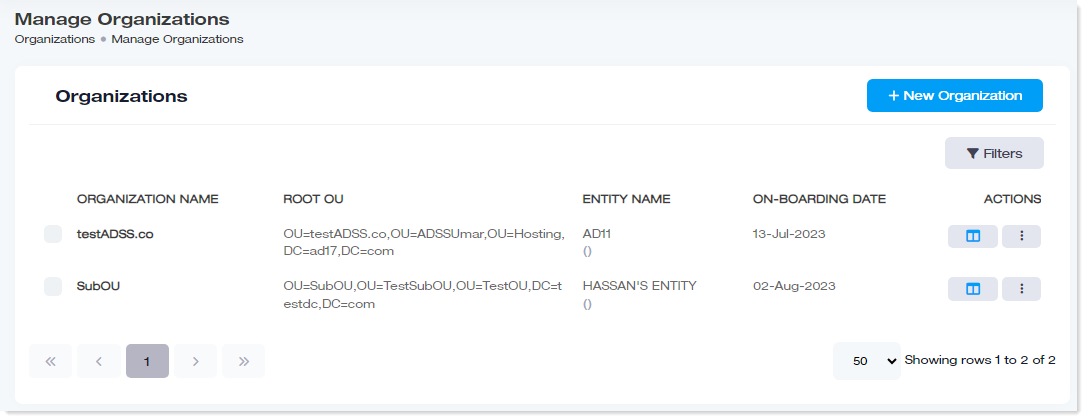
To manage organizations, navigate to the left menu, under the Main section, and click Organizations
|
Manage Organizations page shows the following information:
|
Search an Organization
To search any organization, click Filters. Specify name to search the required organization.
Add New Organization
To add a new organization, click + New Organization. Specify the required information and click Save.
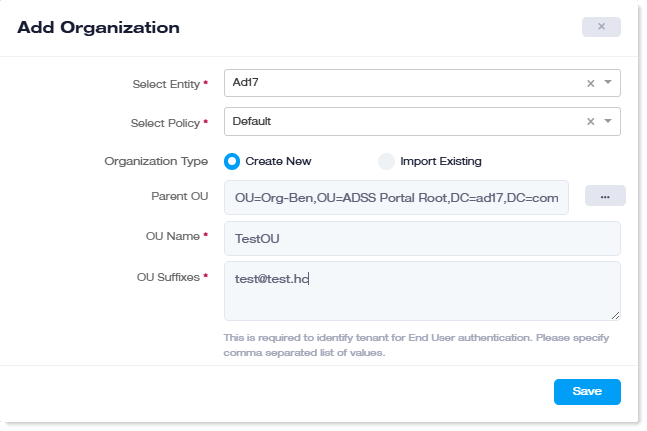
- Select Entity: Select the entity (Active Directory) under which the organization will be created.
- Select Policy: Select a policy for the organization.
- Organization Type: Either a new organization can be created, or an existing organization can be imported from the Active Directory.
- Parent OU: Select a parent organization for the OU being added.
- OU Name: Type the name of the organizational unit. OU will be created with the same name in the Active Directory.
The OU name cannot be typed if the OU is being imported from the Active Directory. The field will display the original name of the OU being imported, in this case. - OU Suffixes: Type domain suffixes for the OU. In case the OU is being imported from the Active Directory, type all the suffixes that already exist against the OU. They are the User Principal Name (UPN) suffixes associated with the OUs in the entity. They are used for identifying the OUs for OU Admin authentication. Login access of OU Admins into ADSS portal will always be validated through these suffixes. If these UPN suffixes don’t match the suffixes of the OU Admin users, they will not be able to log into ADSS portal. The same goes for AD users (enrolled users).
Specify a comma-separated list of suffixes in case there are more than one suffixes.
Import an Existing Organization
To import an organization, click + New Organization. Specify the required information and click Save.
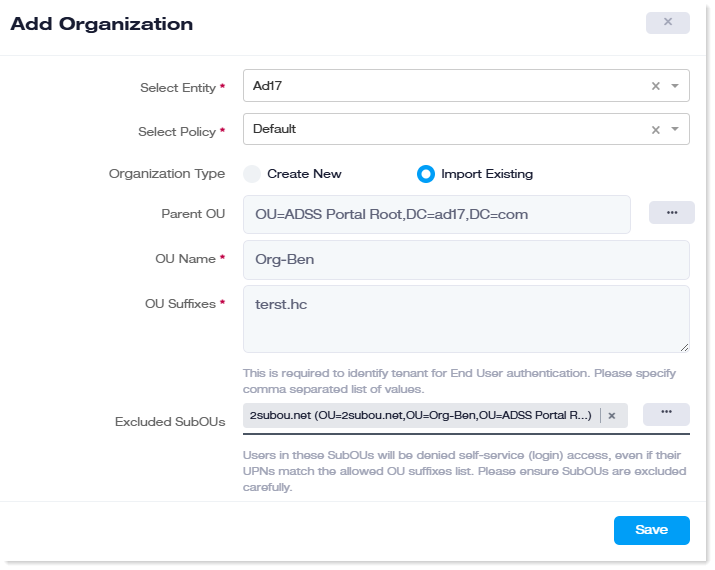
- Select Entity: Select the entity (Active Directory) under which the organization will be imported.
- Select Policy: Select a policy for the organization.
- Organization Type: Select Import Existing.
- Parent OU: Select a parent organization for the OU being imported by clicking
 . This will display the parent OU in a DN syntax.
- OU Name: The OU being imported will be fetched.
- OU Suffixes: OU Suffixes would be fetched automatically by selecting parent OU.
- Exclude SubOUs: Specify the SubOUs you need to exclude from being imported. The mentioned SubOUs of the OU being imported will not be imported, and the users in excluded SubOUs will be denied self-service login access, even if their UPNs match the allowed OU suffixes.
Actions
Actions column, allows admin to perform various operations.
AD Browser
ADSS portal also allows new AD users, groups, contacts, and Sub OUs to be added through its interface. It allows them to be added under their respective organizations (OUs). It presents a full AD Browser to reflect the hierarchy of the organizations, sub-organizations, and the AD objects under them.
Add New User
New AD users can be added through the ADSS portal interface.
To add a new user under AD Browser, click +New, and then User. Specify the following information:
- Selected OU: This indicates the OU under which the user will be created. The OU is displayed in the distinguished name (DN) format.
- Username: Type in the username of the AD user.
- Password: Specify the password for the AD user.
- Generate Password: Click to generate a random password.
- Confirm Password: Re-type password.
- General: Specify the general profile for the user like name, display name, description, and so on.
- Address: Type address information.
- Telephones: Type telephonic information.
- Others: Type other information like company and department name.
Add New Group
New AD groups can be added through the ADSS portal interface.
To add a new group under AD Browser, click +New, and then Group. Specify the following information:
- Selected OU: This indicates the OU under which the group will be created. The OU is displayed in the distinguished name (DN) format.
- Group Type: Select the type of group. ADSS allows the creation of both "Distribution" and "Security" groups.
- Group Name: Type name of the group.
Add New Contact
New AD contacts can be added through the ADSS portal interface.
To add a new contact under AD Browser, click +New, and then Contact. Specify the following information:
- Selected OU: This indicates the OU under which the contact will be created. The OU is displayed in the distinguished name (DN) format.
- Contact Name: Type the name of the contact.
- General: Specify the general profile for the contact like name, display name, description, and so on.
- Address: Type address information.
- Telephones: Type telephonic information.
- Others: Type other information like company and department name.
Add New Sub OU
A parent OU can contain child OUs. These nested OUs are known as sub OUs. Sub OUs can be added under parent OUs through the ADSS portal interface.
To add a new sub OU under AD Browser, click +New, and then Sub OU. Specify the following information:
- Selected OU: This indicates the parent OU under which the sub OU will be created. The OU is displayed in the distinguished name (DN) format.
- Sub OU Name: Type the name of the sub OU to be created.
Add New Domain Suffix
Each OU can be assigned one or more UPN suffixes. These suffixes are then available for use when creating new users in that OU or modifying existing ones. UPN suffixes are used to authenticate user logins.
To add a new domain suffix under AD Browser, click +New, and then Domain Suffix. Specify the following information:
- Selected OU: This indicates the OU to which the suffix will be assigned. The OU is displayed in the distinguished name (DN) format.
- OU Suffix: Type the domain suffixes.
Bulk Import
This allows admin to add new AD objects in bulk by downloading a sample file, filling it with the required details, and uploading it back to the system.
To perform bulk import, click Organizations >> AD Browser >> Bulk Actions >> Bulk Import.
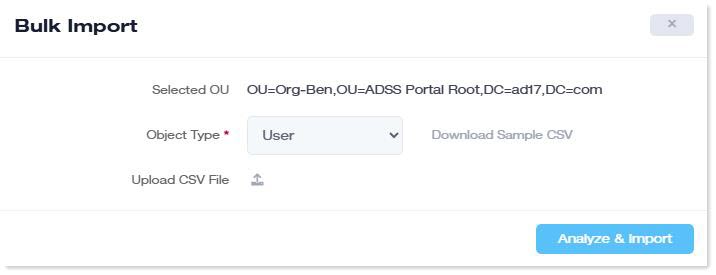
- Selected OU: It displays the Organizational Unit (OU) where the new objects will be imported.
- Object Type: It allows admins to choose the type of AD object you want to import (e.g., User, Contact, Group).
- Upload CSV File: It uploads filled CSV file, containing the bulk data for import. The Sample CSV file can be downloaded here.
- Analyze & Import: After uploading the CSV, clicking this button validates the data and then imports the objects into the selected OU.
Bulk Update
This enables administrators to modify multiple existing AD objects at once using search filters. Instead of editing each object separately, you can update attributes like city, company or department for several objects in a single action.
To perform bulk update, click Organizations >> AD Browser >> Bulk Actions >> Bulk Update.
For User
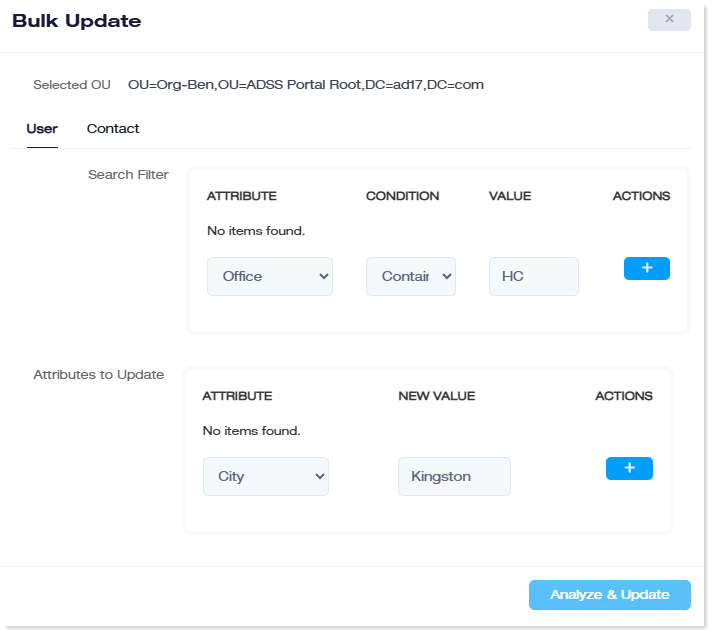
- Selected OU: It displays the Organizational Unit (OU) where updates will be applied.
- Search Filter: It allows admins to search for all users within the OU whose values need to be changed, based on certain search criteria. For example, you can update the values of all users whose City attribute is set to Kingston.
- Attribute: Select the user attribute based on which the values have to be updated (e.g., Department, Title, City).
- Condition: Select the condition to be fulfilled (e.g., equals, contains).
- Value: Specify the matching value for the attribute (e.g., Department = Sales).
- Actions: Add multiple filters with the “+” button. Multiple search filters can be specified here.
- Attributes to Update: It defines what changes should be applied to the filtered users. The values of these attributes will be updated with new ones based on the search criteria defined above. For example, you can replace the values with these new ones for all the filtered users.
- Attribute: Select the user attribute you want to modify (e.g., Title, Phone Number).
- New Value: Select the new value that should replace the old one.
- Actions: Add multiple attributes to be modified using the “+” button. More than one attribute will be affected here.
- Analyze & Update: It runs the process by analyzing the objects that match the search filter and applies the specified updates to them.
For Contact
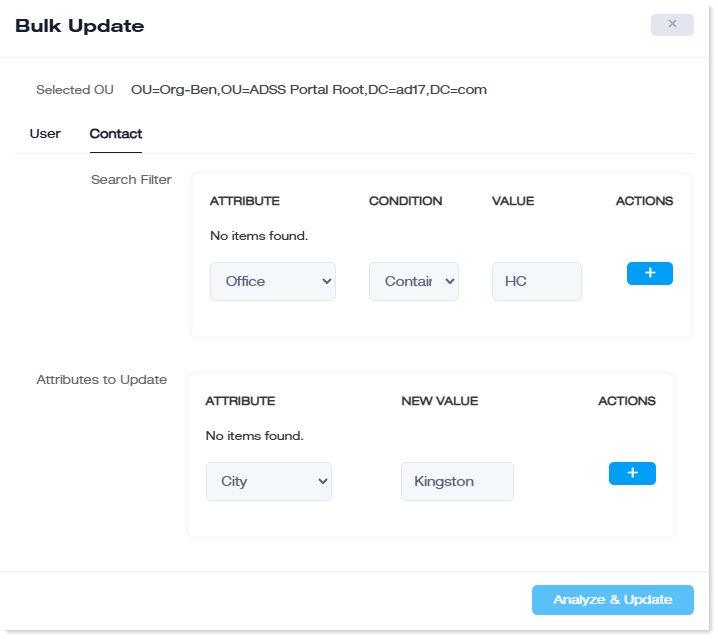
- Selected OU: It displays the Organizational Unit (OU) where updates will be applied.
- Search Filter: It allows admins to search for all contacts within the OU whose values need to be changed, based on certain search criteria. For example, you can update the values of all contacts whose City attribute is set to Kingston.
- Attribute: Select the contact attribute based on which the values have to be updated (e.g., Office, Department, City).
- Condition: Select the condition to be fulfilled (e.g., equals, contains).
- Value: Specify the matching value for the attribute (e.g., Department = Sales).
- Actions: Add multiple filters with the “+” button. Multiple search filters can be specified here.
- Attributes to Update: It defines what changes should be applied to the filtered contacts. The values of these attributes will be updated with new ones based on the search criteria defined above. For example, you can replace the values with these new ones for all the filtered contacts.
- Attribute: Select the contact attribute you want to modify (e.g., Title, City).
- New Value: Specify the new value that should replace the old one.
- Actions: Add multiple attributes to be modified using the “+” button. More than one attribute will be affected here.
- Analyze & Update: It runs the process by analyzing the objects that match the search filter and applies the specified updates to them.
OU Hierarchy
ADSS portal’s AD Browser displays OUs and sub OUs in a convenient hierarchy. Parent OUs can be expanded to reveal child OUs and all AD objects associated with each OU can also be viewed. ADSS portal’s AD Browser imitates the Active Directory to bring a comprehensive view of the organizational unit’s hierarchy.
To select the required OU in the hierarchy, click + and - to toggle between the parent and child OUs on the left. Clicking + will expand the parent OU, exposing child OUs while clicking – will collapse the OU.
AD Objects
This tab lists all AD objects (users, groups, contacts) under the OU. It also allows several operations such as move or delete operations to be performed on the objects
Toggle State
This toggles the state of the users. It disables active users and vice versa.
To toggle the state of any of the AD users, select the user, and then from the Actions drop-down select Toggle State.
Move to
This moves AD objects between OUs. Objects can be moved to parent OUs or child OUs.
To move any of the AD Objects, select the object, and then from the Actions drop-down select Move to. Select the required OU to move the selected AD object to.
Delete
This deletes AD objects.
To remove any of the AD Objects, select the object and then from Actions drop-down select Delete.
Search
This searches for users, groups, and contacts within an OU.
To search users/groups/contacts within an OU, select User or Group or Contact from search drop-down and click Search.
Enable/Disable Account
Just as the state of several users can be toggled at once, users can also be enabled/disabled individually.
To enable/disable any of the AD users, select the user and then under Actions column select Enable/Disable Account.
Reset Password
This allows the passwords of the users to be changed.
To reset the password of any of the AD users, select the user and then under the Actions column select Reset Password.
Move to
To move of any of the AD Object, select the object and then under Actions column select Move to. From Move Object screen, select the destination OU.
Properties
To view properties of any of the AD Object, select the object and then under Actions column select Properties.
Delete
To remove any of the AD Object, select the object and then under Actions column select Delete.
OU Suffixes
Delete
To remove any of the AD Object, select the object and then from Actions drop-down select Delete.
Edit Suffixes
To modify suffixes information, click  under Actions column and modify OU suffixes as required.
Edit Policy
To modify policy information, click under Actions column and select required OU policy from the list as required.
Set License Quota
To set license quota, click  under Actions column and click Set License Quota.
- Entity Name: It displays the name of the entity.
- Organization Name: It displays the name of the organization.
- Available Entity Limit: It shows the remaining AD objects available at the entity level.
- Limit Used by Organization: It shows the number of AD objects currently in use.
- Assigned to Organization: Specify the number of AD objects allocated to the organization.
Rename
To rename OU, click under Actions column and rename as required.
Delete
This deletes the OU from the portal. Deleting an OU from the ADSS portal only removes it from the ADSSP database. It does not remove it from the Active Directory. It is rather a soft delete operation.
To remove OU, click under Actions column and then Delete.