
| Product Documentation
AD Self Service Portal
Manage Policies
Administrators can define policies for Active Directories. A policy includes various small policies for passwords, profiles, and security. A single policy in ADSS Portal includes the following sub-policies:
- General Policy
- Basic Policy
- Advanced Policy
- Password Policy
- User Profile Policy
- MFA Policy
- AD Management Policy
- Lockout Policy
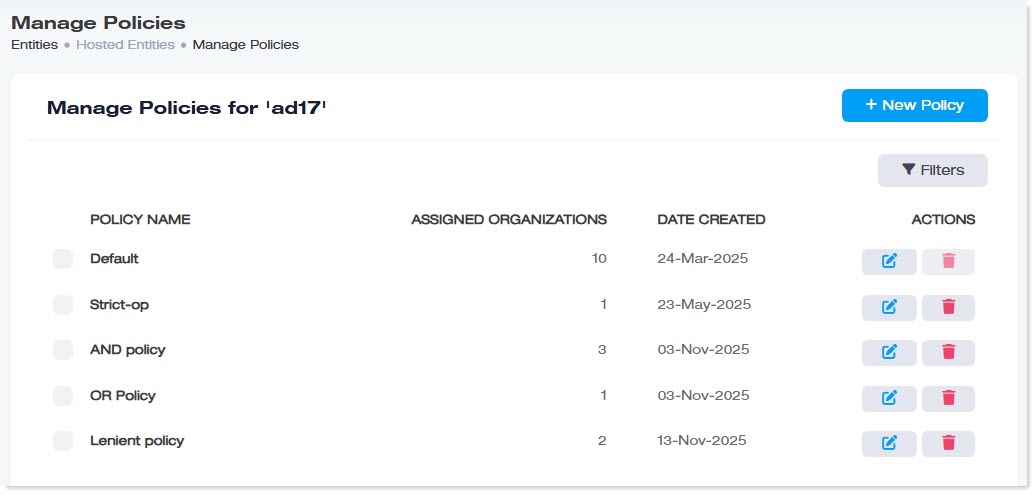
When an entity is on-boarded to ADSS for the first time it comes accompanied by a default policy, however, more policies can always be added later. Policies are applied to organizations (OUs) of the Active Directory. For example, if there are two organizations (OUs) in an Active Directory and there are two policies defined for that Active Directory, the first policy can be applied to the first organization and the second policy can be applied to the second organization.
Policies can be added, edited, or deleted in the entities section however they can be applied to organizations only in the organizations section
To manage policies, in Hosted Entities section, under Actions column, click  .
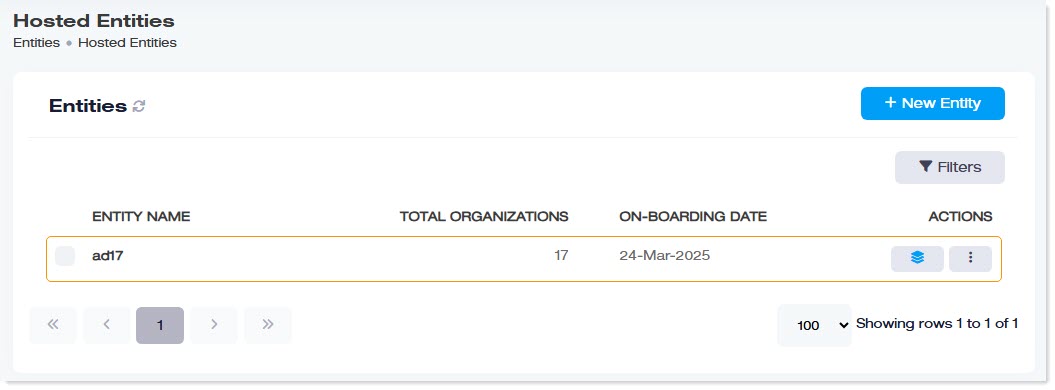
|
Manage Policies page shows the following information:
|
Search a Policy
To search any policy, click Filters. Specify name or suffix to search the required policy.
Add a New Policy
To create a new policy, click +New Policy and specify the required information as:
- Policy Name: Type the name of the policy. The name can be any friendly name of choice.
- Description: Type a brief description of the policy. The description should accurately define what the policy contains.
Edit a Policy
To modify any policy, under Actions column, click  and modify information as required.
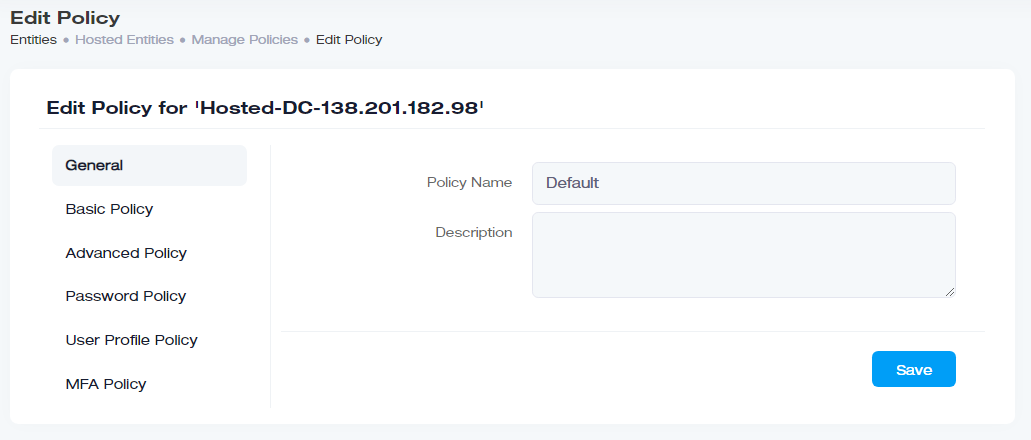
General Policy
This policy provides a name and description of the policy. The name can be any friendly name of choice. The description should accurately define what it contains and which organization (OU) it is to be applied to.
Basic Policy
The basic policy defines certain self-service actions that AD users can perform. It enables admins to allow or disallow users to perform various actions such as updating their profiles, resetting their passwords, and unlocking their accounts. It basically lets admins control certain user operations.
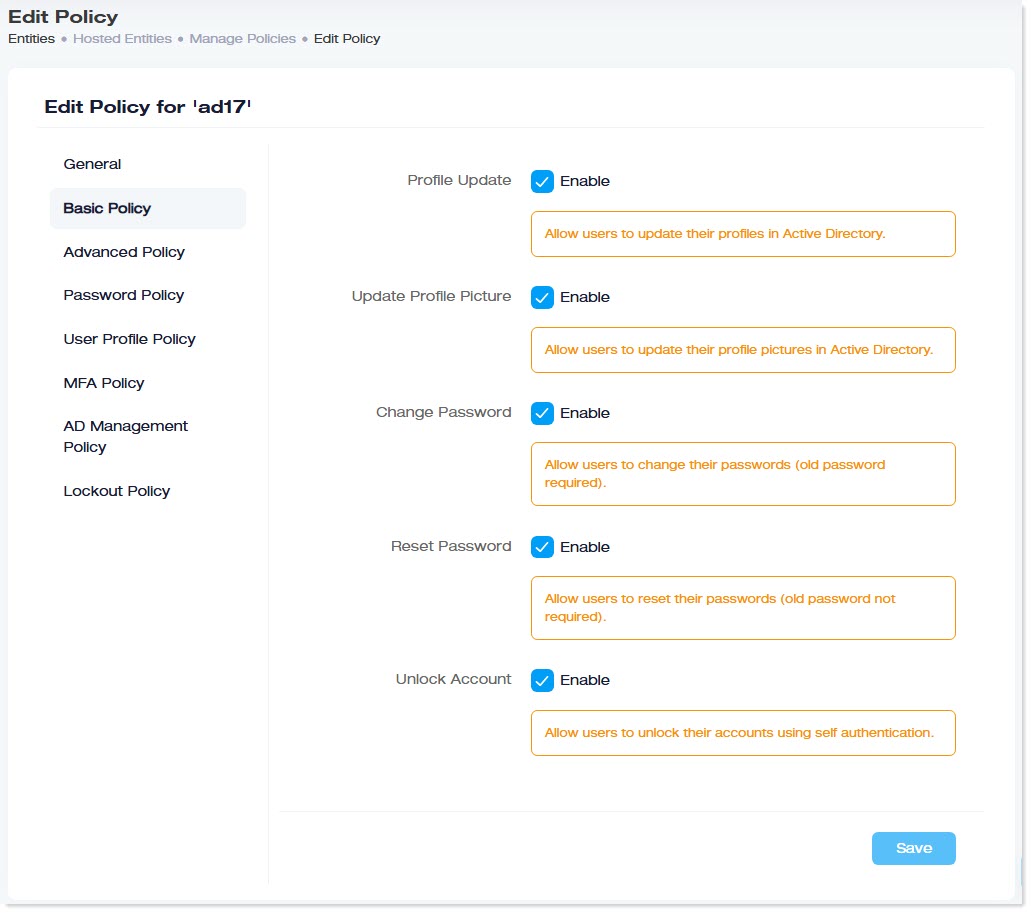
- Profile Update: If enabled, it allows AD users to update their Active Directory profiles.
- Update Profile Picture: If enabled, it allows AD users to update their profile pictures.
- Change Password: If enabled, it allows AD users to change their password. The old password will be required in this case.
- Reset Password: If enabled, it allows AD users to reset their passwords. The old password will not be required in this case.
- Unlock Account: If enabled, it allows AD users to unlock their accounts.
Advanced Policy
The advanced policy defines certain restrictions that can be imposed on AD users. It enables admins to control the times a password can be changed in a day and an account can be unlocked in a day. For example, an AD user can reset its password only 2 times and unlock its account only 4 times a day.
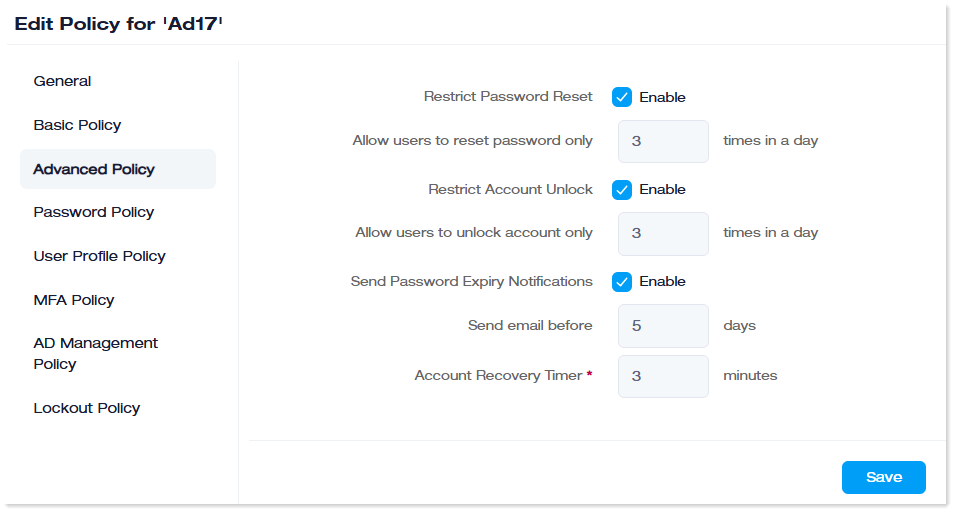
- Restrict Password Reset: If enabled, it restricts the number of times a password can be changed in a day.
- Restrict Account Unlock: If enabled, it restricts the number of times an account can be unlocked in a day.
- Send Password Expiry Notifications: If enabled, an email alert is sent a specified number of days before the password expires.
- Account Recovery Timer: The admin can specify a time limit, measured in minutes, within which an enrolled AD user must reset their password or unlock their account. For example, if the limit is set to 3 minutes, the user must complete the reset or unlock process within that time frame.
Password Policy
This policy enables admins to implement a strong password policy through special characters and variable password lengths.
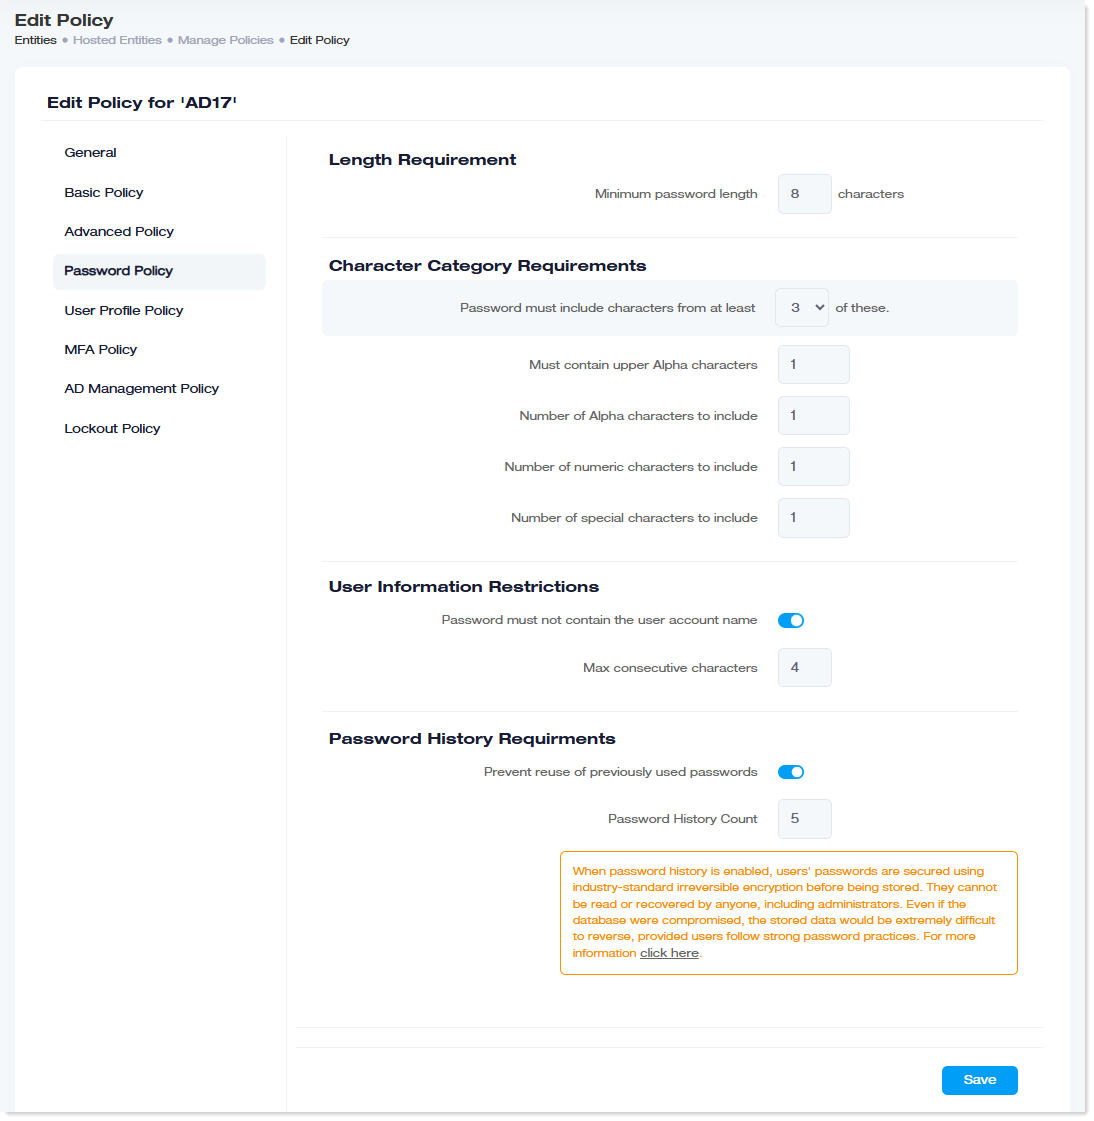
- Length Requirement:
- Minimum password length: Specify the minimum number of characters for passwords.
- Character Category Requirement:
- Password must include characters from at least: Specify the minimum required number of character categories the password must contain, for example, Upper Alpha, Alpha, numeric, special.
- Must Contain Upper Alpha Characters: Specify the minimum number of uppercase letters.
- Number of Alpha characters to include: Specify the number of alphabets to be included in passwords.
- Number of numeric characters to include: Specify the number of digits to be included in passwords.
- Number of special characters to include: Specify the number of special characters to be included in passwords.
- User Information Restriction:
- Password must not contain the user account name: If enabled, users cannot set a password that contains their user account name.
- Password History Requirement:
- Prevent reuse of previously used passwords: If enabled, users can not set a password they have used before.
- Password history count: Specify how many previous passwords should be remembered.
User Profile Policy
This policy enables admins to relabel AD attributes and add new custom attributes. This is how attributes will appear to the AD users in the organization when they enroll themselves for self-service. Not only new attributes can be added, but existing attributes can also be disabled for the users. Disabled attributes will not be visible to the users when they enroll for self-service.
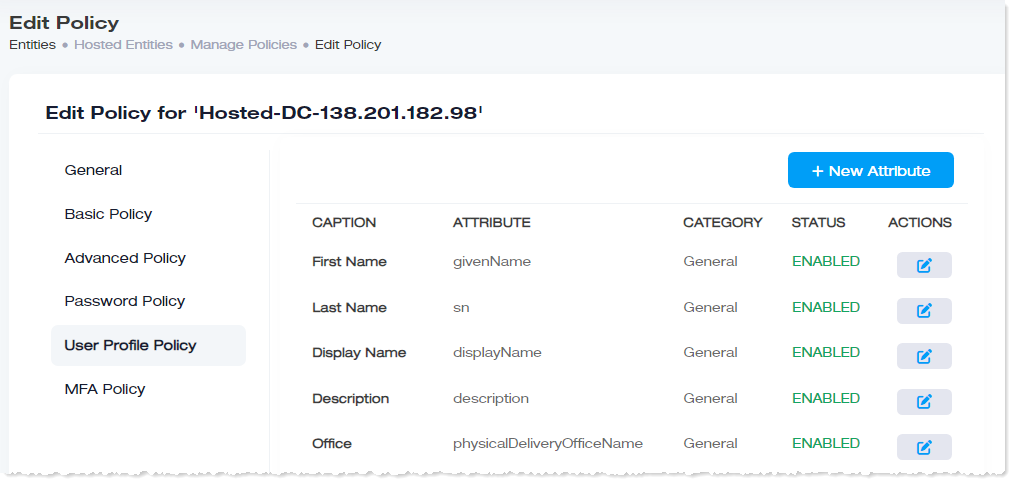
Add New Attribute
User object attributes define basic properties/information about users like first and last name. A user object has multiple attributes.
To add a new attribute, click +New Attribute and specify required details.
- Attribute: Specify the name of the attribute.
- Caption: Specify the caption with which the attribute will appear in the ADSSP.
- English: The caption can appear in English.
- Arabic: The caption can also appear in Arabic. If the language of the client interface is changed to Arabic, the caption will appear in Arabic.
- Section: Select the category to which this attribute belongs. Categories can be naming attributes, address book attributes, and security attributes.
- Enable: Select the Yes checkbox to enable the attribute in the client area. If the attribute is disabled here, the user will not be able to see it when it logs into the client area for self-service.
- Input Type: Select the input type from the list to determine how the attribute will be displayed in the client area.
Available Options:
- Textbox: The attribute will be displayed as a fixed-size textbox field in the client area.
- TextArea: The attribute will be displayed as a resizable text area field in the client area.
- Options: The attribute will be displayed as a drop-down list in the client area.
- Country: The attribute will be displayed as a country selection drop-down list in the client area.
- Help Text: Type the tooltip or help text for the attribute. This helps users identify the exact AD attribute the field represents or may indicate a sample value for the field
- Default Value: Type the default value for the attribute
- Validate Regex: Specify a valid RegEx to validate this attribute value. This is optional, if not specified, the system will not validate the input.
- Read Only: Select the Yes checkbox to make it read-only.
- Is Required: Select the Yes checkbox to make it a required attribute.
Edit Attribute
To modify attribute, click  and modify information as required.
- Attribute: Modify the name of the attribute.
- Caption: Modify the caption with which the attribute will appear in the ADSSP.
- English: The caption can appear in English.
- Arabic: The caption can also appear in Arabic. If the language of the client interface is changed to Arabic, the caption will appear in Arabic.
- Section: Modify the category of the attribute.
- Enable: Select/deselect the Yes checkbox to enable/disable the attribute in the client area.
- Input Type: Modify the input type of the attribute.
- Help Text: Modify the help text of the attribute.
- Default Value: Modify the default value of the attribute. No default value means there is no default value for the attribute.
- Validate Regex:
- Read Only: Select/deselect the Yes checkbox to make the attribute read-only/non-read-only. Read-only attributes can not be edited in the client area.
- Is Required: Select/deselect the Yes checkbox to make the attribute required/not required. Required attributes cannot be left empty.
MFA Policy
This allows the admins to define a multi-factor authentication policy for the hosted Active Directory. MFA is the layer of security for user enrollment. AD users can only enroll for self-service by selecting one or more security questions. The questions can be system defined or AD defined. System defined questions are ADSS defined questions (like what is your favorite color?). The questions and their answers must be defined before users can enroll.
On the other hand, AD defined questions are Active Directory defined questions (like what is your last name?). Their answers are linked with Active Directory attributes and the attribute values must be returned as answers. For example, for the question ‘what is your last name?’ the answer should be the value for the ‘sn’ AD attribute.
Basic Configs
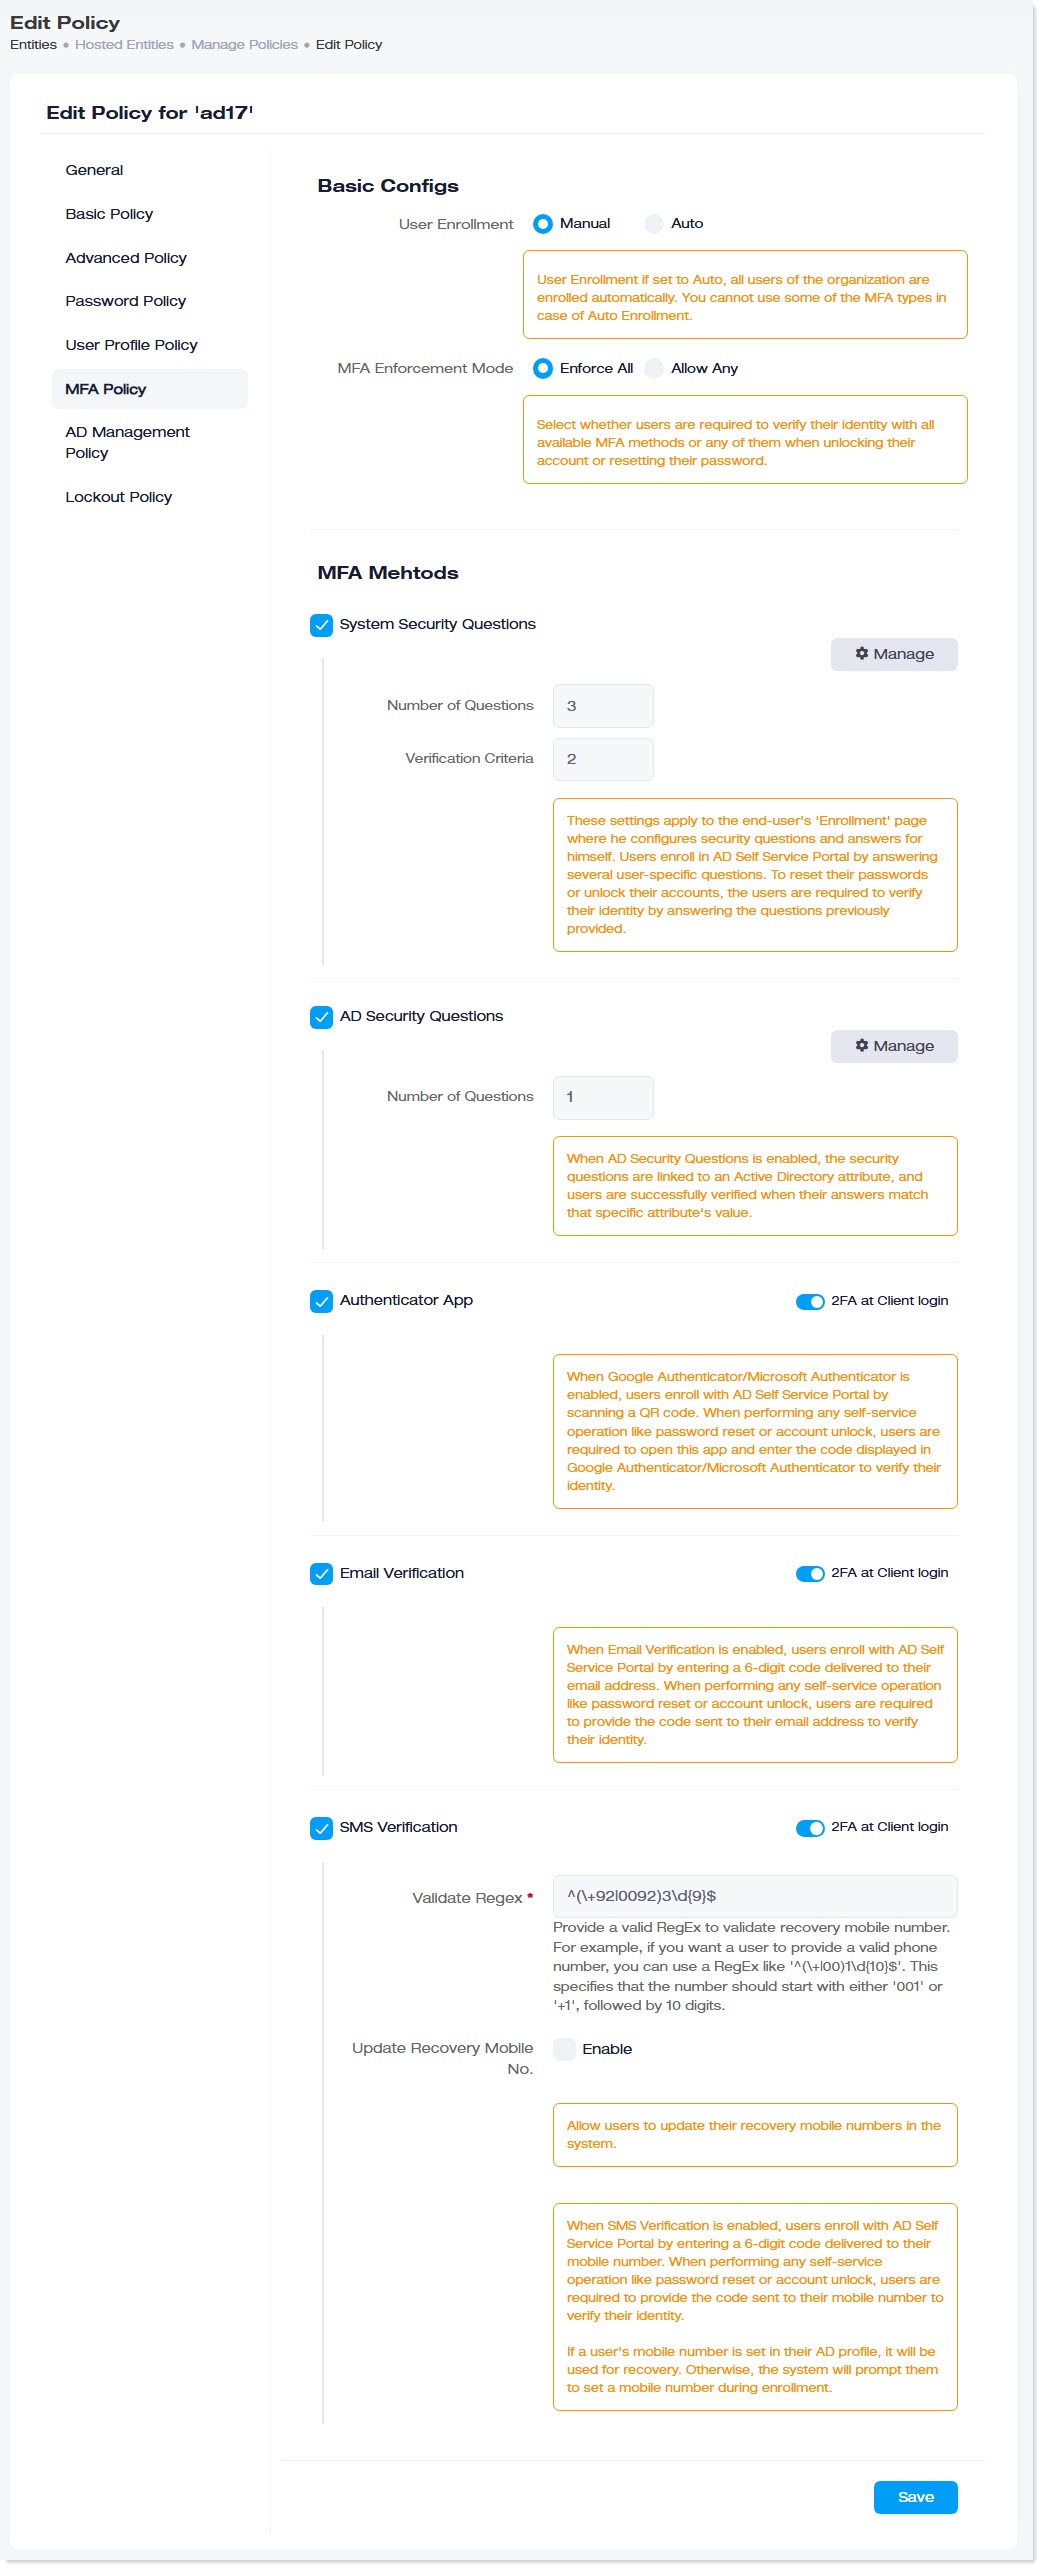
- User Enrollment: User enrollment determines whether users must enrol by answering security questions or whether they come pre-enrolled.
- Manual: In manual enrollment mode the user must select a system defined question or an AD defined question before it can be enrolled. After enrollment if a user forgets its password, it can answer the question and reset its password.
- Auto: In auto enrollment mode all users of the organization come pre-enrolled (already enrolled). Also, in this mode, users can only answer AD defined questions. They do not have the option to answer system defined questions. If a user forgets its password, it can answer the AD defined question and reset its password.
- MFA Enforcement Mode: MFA enforcement mode determines whether AD users must complete all MFA methods before they can enroll for self-service, or whether they can enroll even if they fulfill any of the methods.
- Enforce All: If selected, AD users are required to verify themselves with all available MFA methods before they can enroll for self-service, reset their passwords, or unlock their accounts. For example, if AD Security Questions, Email Verification, and SMS Verification are configured as the available MFA methods, users must verify themselves with all three before they can enroll, unlock their accounts, or reset their passwords. This option forces users to verify their identities with all MFA methods.
- Allow Any: If selected, AD users can verify themselves with any of the available MFA methods. They will not be forced to comply with all. However, if the 2FA toggle is enabled for specific methods out of those any, users must authenticate themselves with both the authentication factors (UPN/password and OTP) at client login.
MFA Methods
- System Security Questions: They are security questions defined by ADSS portal software e.g., what is your favorite color?ADSS portal defines its own questions and AD users must select the questions and their answers before enrollment. Once they are enrolled, they will not be able to reset their passwords or unlock their accounts without correctly answering these questions.
- Enable: If enabled, the AD users must select one or more system defined security questions before they can be enrolled.
- Number of Questions: Users can select one or more than one security questions before enrollment.
- Verification Criteria: This indicates the number of questions out of the total questions, that should be answered correctly before users can reset their passwords or unlock their accounts. For example, if there are 3 security questions specified and the verification criteria is set to 2, this means the users should answer at least 2 security questions correctly before they can reset their passwords or unlock their accounts.
- Manage: You can manage your system defined questions through ADSS portal. You may edit, disable, or delete any of the default questions or you may add any new question of your choice to the list. Disabled questions will not be displayed to the users before enrollment.
- AD Security Questions: In addition to system defined questions, users have the option to select Active Directory defined security questions. AD defined questions rely on Active Directory attributes for their answers. The values of the attributes are the answers to these questions and users need to correctly provide these values while answering questions. For example, the answer to the AD question ‘what is your last name?’ is the value for the ‘sn’ AD attribute.
Both types of questions can be enabled at the same time, allowing users to select and answer both types before enrollment.- Number of Questions: Users can select one or more than one AD questions before enrollment. If the enrollment mode is manual all selected questions must be answered.
- Manage: You can manage your AD defined questions through ADSS portal. You may edit, disable, or delete any of the default questions or you may add any new question of your choice to the list.
- Number of Questions: Users can select one or more than one AD questions before enrollment. If the enrollment mode is manual all selected questions must be answered.
- Authenticator App: If enabled, it allows AD users to enroll themselves with the help of authenticator apps (Google Authenticator/Microsoft Authenticator). Any of these authenticator apps can be installed on a mobile device/smartphone and a QR code can be scanned to obtain a verification code. This code can then be entered by the user, into the ADSS portal to identify itself. Once verified the user is enrolled. When performing any self-service operation like password reset or account unlock, users are again required to open the app and enter the code displayed in the app into ADSS portal, to verify their identity.
A key can also be entered into the authenticator app to obtain the unique verification code.For email verification, it's necessary that Email Delivery Settings under Notification Delivery Settings should be configured. To learn more about Email Delivery Settings, see Notifications. - Email Verification: If enabled, it allows AD users to enroll themselves with email. A 6-digit code is sent to the email address of the AD user. This code can then be entered by the user, into the ADSS portal to identify itself. Once verified the user is enrolled. When performing any self-service operation like password reset or account unlock, users are again required to enter the 6-digit code into ADSS portal, to verify their identity.
For email verification to work the email attribute of the user must contain a valid email address.For SMS verification, an SMS gateway must be configured under SMS Delivery Settings. To learn more about SMS Delivery Settings, see Notifications. - SMS Verification: If enabled, it allows AD users to enroll themselves with the help of SMS. If an SMS gateway is configured in ADSSP, users can enroll themselves by entering a 6-digit code delivered to their mobile numbers.
- Validate Regex: This allows you to specify a regular expression (RegEx) for the mobile number. For example, if you want a user to provide a valid phone number, you can use a RegEx like '^(\+|00)1\d{10}$'. This specifies that the number should start with either '001' or '+1', followed by 10 digits. To learn how Active Directory users can enter mobile numbers in the client interface in accordance with the configured regular expression (RegEx), refer to Enrolling through SMS Verification.
- Update Recovery Mobile No:
AD Management Policy
This policy allows the administrators to regulate the creation, update, and deletion of AD objects. If admins restrict the creation or deletion of AD objects here, no new objects can be created or deleted through the portal. These restrictions apply to the objects of the organization, to which the policy has been applied.
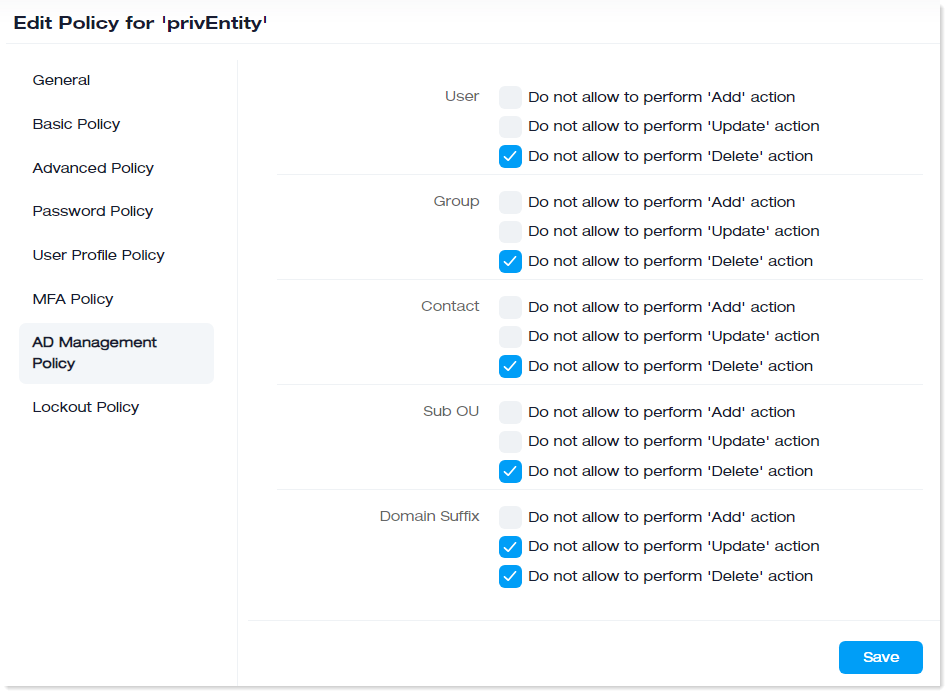
- Do not allow to perform Add action: If selected, administrators cannot add new objects through the portal.
- Do not allow to perform Update action: If selected, administrators cannot update existing objects through the portal.
- Do not allow to perform Delete action: If selected, administrators cannot delete objects through the portal.
Lockout Policy
This policy is a security measure that allows admins to block the login of enrolled users to their client interfaces. It is designed to strengthen security by temporarily disabling the access of enrolled users after a specified number of incorrect login attempts. The access is automatically reinstated over time or can be manually reinstated by the admin.
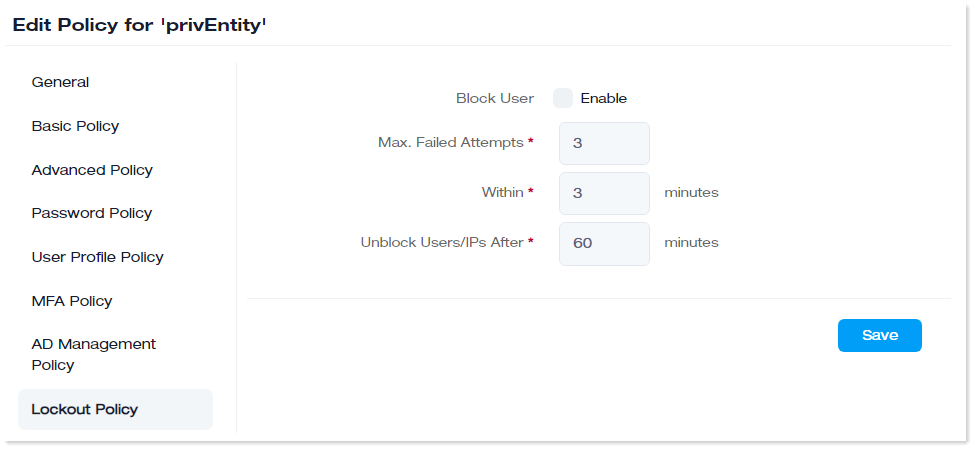
- Block User: If the Enable checkbox is selected, login access to the client interface of the enrolled users will be blocked after several unsuccessful attempts. ADSSP also sends an email notification to the user for each failed login attempt.
- Max. Failed Attempts: These are the maximum number of failed attempts allowed before the access of the enrolled users is blocked.
- Within: This is the time (in minutes) within which all failed attempts should lie. For example, user access can be blocked if 2 failed attempts are made within a gap of 3 minutes.
- Unblock Users/IPs After: This is the time after which the user or IP will be unblocked automatically. For instance, the user access will be unblocked automatically after 30 minutes.
The administrator can also manually unblock the access.
Delete a Policy
To remove any policy, under Actions column, click  .