
| Product Documentation
HC Marketplace
Configurations
 Admin Configurations
Admin configurations present various access, billing and tax configurations that the host can perform for its customers. It performs these configurations globally. This means that they are applied to all its customers. To configure admin related settings in HC Marketplace you have to login as an administrator and then from the top navigate to Configurations >> Admin Configurations.
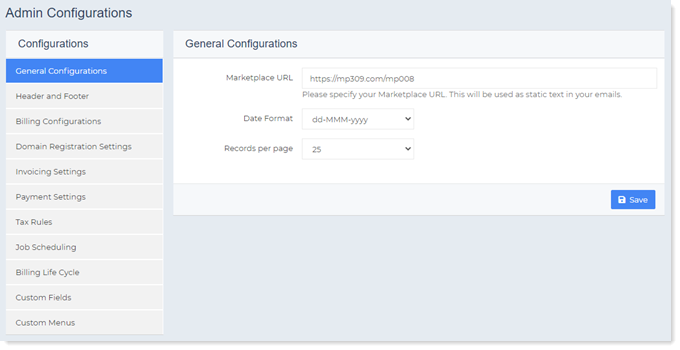
General Settings
These configurations mainly present the URL for the Marketplace, the host makes available to its customers. The customer can access its control panel as well as the Marketplace (online store) at this URL. This URL also goes out as static text, in the setup email to the customer. To configure general settings specify the following.
- Marketplace URL: This specifies the Marketplace (online store) URL for the customer e.g. https://website.com.
- Date Format: This allows the host to define a date format for marketplace and billing. Any change in the format will reflect across all invoices, payments, orders etc.
dd-MMM-yyyy MMM-dd-yyyy MM/dd/yyyy
- Records per Page: This delimits the number of records that can appear on a single page.
Header and Footer of Email Templates
The headers and footers of the email templates can be customized.
- Email Header: Headers can be customized here.
- Email Footer: Footers can be customized here.
Billing Settings
These present some important billing configurations. The host can set these configurations for invoices sent to customers and payments received from them. These configurations provides different settings pertaining to the currency of the invoice and the time of its generation.
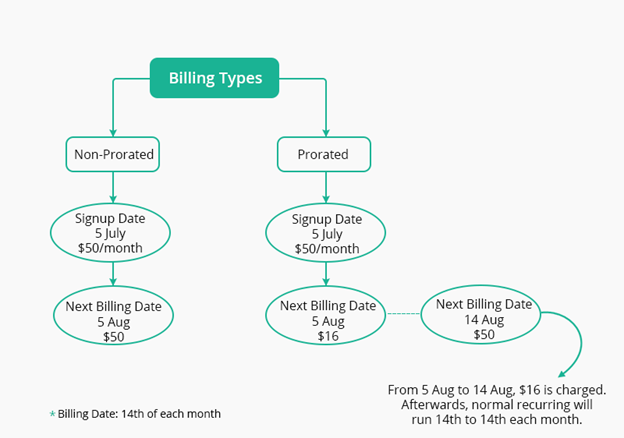
- Billing Type: There are two kinds of billing i.e. prorated and non-prorated.
- Prorated Billing: Prorated billing is a common billing method in the hosting industry. If the billing type is prorated then the billing system charges a complete month and then first recurring is prorated. For instance if a customer signs up to a $50 plan on 5th July and its billing day is 14th, it would be charged $50 for a complete month i.e. 5th July – 5th August. On 5th August it will be charged $16 for the period 5th August – 14th August (prorated) and onward billing will be from 14th to 14th each month.
- Non-Prorated Billing: In Non-prorated billing the recurring is done on the date of signup e.g. 5th of each month.
- Billing Day: Is the day of the month, on which the bill (invoice) is generated.
Billing day is only relevant in case of prorated billing. - Billing Precision: Billing Precision indicates the number of decimal places in the billing amounts. Suppose the host selects 2 from the drop-down list box then only 2 spaces after the decimal point would be considered and not the entire value e.g. 5467.98769 (769 would be ignored while billing). The billing precision once set, carries throughout the billing transactions.
- Default Currency: Marketplace supports almost all currencies available worldwide. However the currency of the Marketplace cannot be changed once a product has been sold.
- Currency Symbol Position: The currency symbol can either be prefixed to the value or can be suffixed to it e.g. $10 or 10$.
Domain Registration Settings
Domains are frequently renewed at the domain registrar end and these frequent renewals may give rise to inconsistencies in expiry dates between domain registrars and the Marketplace. To overcome these discrepancies, the Marketplace extends a synchronization feature that synchronizes the dates between the domain registrars and the Marketplace. Moreover the Marketplace can also raise invoices to customers if domains are found renewed at the backend (at the domain registrar end). The customers will be invoiced for the same durations the domains are renewed for. For instance if a domain is renewed for a period of two years, the customer will be invoiced for two years.
- Domain Auto Sync: This option matches and synchronizes domain expiry dates between domain registrars and the Marketplace. If domains have been renewed at the backend (at the domain registrar end) and their new expiry dates have not yet reflected in the Marketplace, this option helps in synchronizing the dates. Synchronization is handled through the ‘MPBillingSync’ task in the task scheduler and this synchronization task can be scheduled to run once or twice daily and check and update the dates accordingly.
- Domain Sync Invoicing: This option raises invoices to customers if domains are found renewed at the backend (at the domain registrar end). If the host wants the Marketplace to handle invoicing for domain renewals and also wants the invoices to be generated automatically if the domains are renewed at the backend, it can choose this option. The Marketplace will check and raise invoices to the customers, even if the domains are renewed directly through the domain registrar interface. The customers will be invoiced for the same durations the domains are renewed for. For example if a domain is renewed for a period of two years at the backend, the customer will be invoiced for the same. This auto checking and synchronization is handled through the ‘MPBillingSync’ task in the task scheduler. The task will run once or twice daily and will check all renewed domains and will generate invoices for them.
Invoice Settings
These give various settings pertaining to the format of the invoice and alerts set against it.
Alert Settings
These provide settings for alert notifications, sent out to customers for due invoices.
- Email Alert: Sometimes it’s very helpful to send an impending payment alert email to customers before their invoices become due. This serves to notify customers well in advance. Host can specify the number of days here or may choose not to send an alert. In case the host does not want to send the alert, it can choose Never.
- Overdue Reminder: Reminders are sent after the invoices have been generated and are due. They help in notifying customers to pay, especially if the invoices are yet to be cleared. Host can specify the number of days here or may choose never to send overdue reminders.
Invoice Settings
These settings affect the format of the invoice. To configure invoice settings specify the following.
- Invoice# Format: This defines the format for the invoice number. For instance if the full invoice number is INV{00005}-{2019}-{09}-{18}, the counter indicate the automatically generated prefix (00005). It increments automatically. Counter is a mandatory section and should necessarily be a part of the system. The year indicates the year of the invoice (2019). The month indicates the month of the invoice (09) and the day indicates the day of the invoice (18).
- Invoice# Auto Increment: This regulates the difference between the invoice counters. The number specified here determines the exact difference to be inserted between subsequent invoices. For instance if the first invoice counter is 00005 and the increment is 2, the second invoice counter will be 00007. Default is 1.
- Invoice# Padding: This gives the number of digits that should be prefixed to the invoice number e.g. 00001. Default is 5 digits.
Recurring Prefix: This defines the prefix for recurring invoices. It can be any string. Default is R.
Payment Settings
They are settings pertaining to payments made through credit cards. To configure payment settings specify the followings.
- Maximum Declined Transaction Attempts: Some gateways charge extra for each declined credit card transaction therefore it’s necessary to limit the max number of attempts in case of declined credit card transactions. This field defines the maximum number of declined attempts that can be made to charge credit cards.
- Minimum Charge: Sometimes it’s not feasible for the customer to submit a very small payment. It may incur an undesirable charge, not viable for the customer. This field limits the minimum amount the customer can submit through credit card. The customer will not be able to submit a payment less than this amount. Default is 1.
This limit is only for payments made through credit card. It does not apply to funds added directly by the host to the customer’s wallet.
Tax Rules
Hosts can create tax rules and apply tax rates to subscriptions. Each country can have its own tax rules. Moreover provinces / states of a country can have their own tax rules. If a tax rule is in place and a customer subscribes a product, the tax is added to the product price automatically. To configure tax rules specify the following.
Add Tax Rules
Different tax rules can be added here. To add a tax rule specify the following.
- Tax Rule Name: This is a friendly name for the tax rule. The name should be such that conveys the nature and purpose of the rule.
- Tax Rate (%): Tax rate is applied as a percentage to the subscription price of a product. The resultant tax is then automatically added to the invoice.
- Country: The tax can either be restricted to a specific country or can be defined for all regions in general. Anywhere should be selected In case it is to be defined globally. Separate tax rules can be created for different countries.
- Province/State: Tax can further be restricted to a specific state or province of a country or applied to all states in general. Separate tax rules can be created for different states of a country.
- Status: The status of a tax rule can either be active or suspended. Suspended tax rules do not apply.
Edit Tax Rules
Tax rules can also be edited.
Job Scheduling
Some tasks in Marketplace are repetitive in nature such as generating recurring invoices or sending out email notifications. Such routine tasks need proper scheduling. Marketplace offers two task schedulers for executing routine jobs at pre-defined times or after specified time intervals.
- External Library (Web Based): Explanation here.
- System Task Scheduler: The System Task Scheduler utilizes the Windows Task Scheduler. If this option is selected, it is the host’s responsibility to create tasks in the system. Failing to do so will prevent Marketplace from performing auto invoicing and billing. System Task Scheduler can only be used if the host is the owner of the system/server or has access to the system. Two tasks are required to be created in the system if the System Task Scheduler is selected as the scheduler:
- MPEmailSync: It is for scheduling emails with one minute interval.
- MPBillingSync: It is for scheduling recurring billing tasks with 24 hours interval.
Billing Life Cycle
There are certain safeguards in place, in case due bills are not cleared by customers. These safeguards manifest themselves in the form of a billing life cycle. A host can trigger the billing life cycle as soon as any customer’s bill falls in the due category, passing the customer through the different stages of the life cycle. The life cycle makes certain restraints available at each stage in case of non-payment, until the final restraint i.e. a user termination notice.
- Grace Days: Customers may be allowed a grace period to clear their due bills. If the dues are cleared within the stipulated grace period they are relieved from facing the next stage. However if their dues remain outstanding, customers enter the next level of the life cycle which restricts their access to the Marketplace. The grace period is extended in terms of days and after expiry of grace days if any, Marketplace restricts customers’ access to their login. Choosing infinite grace days allows customers unlimited freedom. The access to their login is never restricted, even if they don’t pay.
- Access Lock Days: If after the expiry of the grace period dues still remain pending, the Marketplace restricts customer access. This is known as the Access Lock. Customers will be able to login with their credentials but will be displayed only a payment form, without being able to carry on any further operations. If they pay they are reinstated. The access lock comes secured in terms of days.
- Users Termination Enabled: If the previous restriction goes unheeded, the host reserves the right to delete customer. Customer termination is the third and the final level in the life cycle. If after expiry of access lock days, customers still don’t pay, Marketplace sends a mail to the host listing all the defaulters. The host can then choose which customers to delete. The delete operation will delete customer data, denying the customer login to its account.
Custom Fields
They are additional fields in the billing profile and general profile of the customer. They are meant to provide extra information if any, for customers. Host can insert these fields into the general and billing profiles of its customers. To configure custom fields specify the followings.
Add Custom Fields
To add a custom field specify the following.
- Custom Field Name: This indicates the name of the custom field.
Visible in: This indicates where the custom field is located. It can be located in the customer’s billing profile and its general profile. - Optional: This indicates whether the custom field is mandatory or optional. Enabling the check box makes the custom field optional.
Edit Custom Fields
To edit custom fields modify information as required.
Custom Menus
Custom menus are your own menu items which may be added to the interface besides the permanent ones. Marketplace lets you add custom menus to both the host (admin) section and the customer section. To configure custom menus specify the following.
Add Custom Menus
To add a custom menu specify the following.
- Display Name: This indicates the name of the custom menu.
- Menu URL: It is the destination URL to be opened when the menu is clicked.
- Visible For: Custom menus can be added both to the host (admin) section and the customer section. The field specifies whether the custom menu is to be made visible to the host (admin) section or the customer section or to both.
Edit Custom Menus
To edit custom menu modify information as required.
 Security Configurations
Security configurations offers security configurations for the online store. To configure security related settings in HC Marketplace you have to login as an administrator and then navigate to Configurations >> Security Configurations.
Password Complexity
Enabling password complexity ensures that user passwords meet certain guidelines such as certain lengths or number of characters. Password complexity guarantees strong user passwords. To enable password complexity, specify the followings.
- Password Complexity: In order to secure user passwords, complexity should be enabled. If the check box is not checked the Marketplace will not enforce password complexity on user passwords. Select Enable to allow password complexity.
- Minimum Password Length: This field defines the minimum number of characters the password length should be. It cannot be less than 5 characters.
- No. of Numeric Characters: This field defines the minimum number of numeric characters (0-9) the password should hold. Passwords should contain at least the specified number of numeric characters.
- No. of Non-Alphanumeric Characters: This field defines the minimum number of special characters (! @# etc.) the password should hold. Passwords should contain at least the specified number of special characters.
- No. of Alpha Characters: This field defines the minimum number of alphabets (upper case and lower case) the password should hold. Passwords should contain at least the specified number of a mix of uppercase and lowercase alphabets ([a-z] [A-Z]).
- No. of Uppercase Alpha Characters: This field defines the minimum number of uppercase alphabets the password should hold. Passwords should contain at least the specified number of uppercase alphabets (A-Z).
Security Features
CAPTCHA and 2FA provide additional layers of security for customer logins. CAPTCHA establishes that the customer logging in to the Marketplace is a human and not a bot. It lets a valid user pass through while blocks the access of a bot. 2FA verifies and protects customer logins through a second factor i.e. a one-time-password (OTP). To configure security features specify the followings.
CAPTCHA
To configure CAPTCHA specify the followings.
- CAPTCHA: Select Enable checkbox to avail these services.
- CAPTCHA Type: There are two types of CAPTCHA services available in the Marketplace.
CAPTCHA Type 1: Default (5 character verification code) CAPTCHA Type 2: reCAPTCHA (Google's reCAPTCHA System) The first supported CAPTCHA type is default (5 character verification code). It employs five characters or numbers to verify login.
CAPTCHA Image Code: It is a Character/Number code displayed on the login screen. To protect Marketplace from abuse the user must insert the correct code at the time of login. Only after entering the correct verification code will the user be able to login.
Character Verification Code (Default): It displays a specified number of characters as CAPTCHA code. The user must insert these characters to set itself apart from a bot. This is the default.
Numbers Verification Code: It displays numbers as CAPTCHA code. The user must insert these numbers to set itself apart from a bot.
No. of Characters/Numbers: This allows the customer to choose the number of characters/numbers to display as CAPTCHA code. Only the specified number of characters/numbers will be displayed.
The second supported CAPTCHA type employs the Google reCAPTCHA free security service to protect Marketplace logins against bots.
reCAPTCHASite Key: This site key is used in the HTML code, the Marketplace site serves to users.
reCAPTCHASecret Key: This secret key is used for communication between the Marketplace site and Google reCAPTCHA.
You need to register for reCAPTCHA here
Two-Factor Authentication
Two-factor authentication (2FA) or multi-factor authentication (MFA) as it’s sometimes called, is an additional layer of security for customer logins. Against the backdrop of an ever changing security situation, securing login only through passwords is not enough. With 2FA customers provide two different authentication factors to verify themselves. Besides the first typical factor i.e. the password, customers can provide a second factor such as a one-time-password (OTP) to login to the Marketplace. The Marketplace supports 2FA and allows customers to receive their OTP through Email, Google Authenticator or SMS. To configure 2FA specify the followings.
| General Settings | OTP Delivery Mode |
|
Here you may grant your customers the ability to use Two Factor Authentication for their marketplace login. This setting will not actually enforce Two Factor Authentication on your customers. Instead it will only provide them the necessary control to enable or disable it for their individual accounts. Enable 2FA: Here the customers can be granted the ability to use Two Factor Authentication for their marketplace logins. This setting will not actually enforce Two Factor Authentication on customers. Instead it will only provide them the necessary control to enable or disable it for their individual accounts. The 2FA check box must be checked in order to avail the feature. OTP Expiry Time: If 2FA is enabled, customers will not be able to login without a valid OTP. After the OTP is received, it remains valid for a certain time. If not used within the stipulated time, it expires. Here the time limit to its expiry can be specified. |
This gives the mode through which Marketplace customers receive their One-Time-Password (OTP) for login (where applicable). Enabling any of the modes here will ensure their display across all customers, allowing them in turn to choose the appropriate one. Disabling an already enabled mode will remove 2FA for customers using it. via Email: OTP can be received via Email. In case this option is selected, OTP will be received on the email specified in the user's personal profile. via Authenticator App (i.e. Google Authenticator): Google Authenticator is a mobile app. OTP can be received on customer’s Google Authenticator app.
|
 Store Configurations
Store configurations present various layout and branding configurations for the online store. The host defines these settings globally for the online store. To configure store related settings in HC Marketplace you have to login as an administrator and then navigate to Configurations >> Store Configurations.
Enable Marketplace System
These configurations mainly present the modes of signup such as free or charged. They also let the host control the ability to enable the Marketplace or disable it entirely for customers. To enable marketplace system navigate to Store Configurations >> General Configurations and specify the followings.
- Marketplace: This option lets the host control the availability or unavailability of the Marketplace system. Unchecking the option disables the Marketplace entirely. If disabled, the customers cannot see or subscribe any product from the online store.
- Marketplace Mode: The option permits the host to choose how new signups should be processed by the Marketplace system. With Authorized mode, each new signup will not be processed until it is approved by the host. In the Capture mode, new customers with all their resources will immediately be created and provisioned.
- Top Level Domain: The option allows third level domain signups to shared hosting customers. For all third level domain signups, the host needs to specify a top level domain here.
- Free Purchase Mode: Occasionally the host may need to allow free purchases. Marketplace enables the customers to provision resources free of cost, if required. Enabling this option permits the customers to provision resources into HC without providing payment information.
- Invoice Only Mode: This option allows system to do invoicing only. System will not take any responsibility to capture the payments. This option is suitable for customers using some external mechanism to receive payments.
Payment gateways will not be visible in Configurations if Invoice Only Mode is enabled. They will be visible only when Invoice Only Mode is disabled
Terms of Services
Host can draft and implement its own terms of service (TOS). They are displayed on the checkout page. Only after agreeing to these terms can the customer checkout. To modify terms of services edit the agreement as required.
Layout for Product Listing Page
They give the layouts for the products listing page. Out of 3 layouts any one can be selected. To modify layouts of products listing page select any of the available layout as required.
Localization
The entire text of the Marketplace can be localized to match the host’s locale. For localization specify text as required and update your changes.
 Provisioning Servers
Provisioning servers are the control servers (where HC control panel is installed). The control server constitutes the main backbone of HC. It carries HC Primary installation and is responsible for performing or routing provisioning tasks. To configure server related settings in HC Marketplace you have to login as an administrator and then navigate to Configurations >> Provisioning Servers.
Managing Provisioning Servers
The control server(s) are listed here.
Edit Provisioning Server
To edit provisioning server modify information as required.
- Server Friendly Name: Type a friendly name for the control server.
- Username: Type username of the HC panel user, configuring the Marketplace. The HC control panel user can be an HC host or an HC reseller.
- Password: Type password for the user.
- API Access URL: The same API URL used by HC for the control server. Insert address http://localhost:8798 if Marketplace and HC control server are on the same machine. However if Marketplace is on a different machine/location then provide a URL that is accessible from current server.
 Domain Registrars
With the help of supported Domain Name Registrars, the Marketplace lets customers register, renew, transfer, check availability of domains. For details see Domain Registrars. To configure domain registrars in HC Marketplace you have to login as an administrator and then navigate to Configurations >> Domain Registrars.
 Payment Gateways
Payment gateway is a software that processes credit card payments for e-businesses and traditional brick and mortar stores. Marketplace allows a number of payment gateways to be configured for facilitating online transactions. For details see Payment Gateways.
 Emails
Host can control the way emails are sent out to various recipients, from the Marketplace. For details see Emails. To configure emails, login as an administrator and then navigate to Configurations >> Emails.