
| Product Documentation
HC Marketplace
Integrating a New Payment Gateway
Introduction
Hosting Controller is a hybrid cloud control panel, designed to automate all aspects of your business including service provisioning, billing, metering, customer management and on-boarding of new services. It offers a fully integrated Marketplace, capable of accepting one-time and recurring online payments through tight integration of payment Gateways. If for any reason you don’t want to utilize any of the already available payment Gateways in the Marketplace, you may choose to integrate your own Gateway. The objective of the guide is to elaborate the process of integrating your own Gateway in the Marketplace.
Accepting Payments Online
For E-commerce merchants it’s particularly important to accept payments online. Accepting payments online entails online credit card processing. A payment Gateway is the main link between your bank and the customer’s credit card provider. HC Marketplace supports various payment Gateways. Gateways can be found in the “Payment Gateways” menu under “Configurations”.
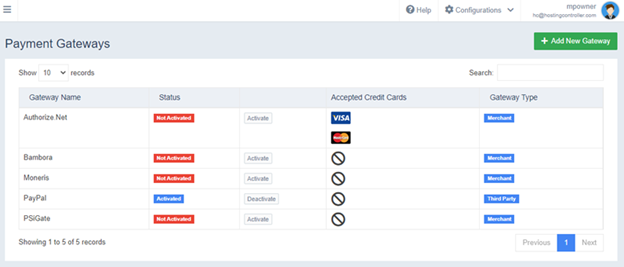
For users who don’t want to accept payments with already available Gateways, the Marketplace sanctions easy integration of other payment Gateways of choice. This guide demonstrates the integration process of such Gateways of choice.
Supported Gateways
HC Marketplace supports two types of payment Gateways.
Third-party Gateways
These Gateways direct the customers away from the Marketplace, taking them to the payment Gateway’s website. Here customers fill in their payment details, and after paying, are redirected back to the Marketplace to complete the checkout process. A popular example of a Third-party Gateway is PayPal.
Merchant Gateways:
These Gateways process the payments remaining within the Marketplace. They use the securely stored credit card information from the Marketplace database and process payment within it. An example of a Merchant Gateway is Authorize.Net. HC Marketplace allows easy integration of new payment Gateways. There are two parts to these integrations. First where you add a new Gateway to Marketplace with its detail and second where you need to add its backend code to send request to the Gateway and parse response to decide the payment status.
Part 1 (on Marketplace):
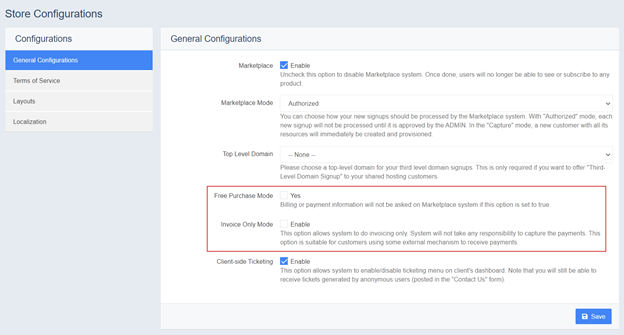
Before integrating a new Gateway make sure to uncheck “Free Purchase Mode” and “Invoice Only Mode” under “Store Configurations”.
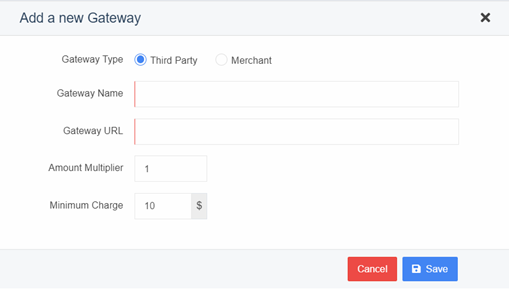
The first step in integrating a new Gateway is adding a new Gateway. Click “Add New Gateway” and depending on its type (Third Party or Merchant) add the new Gateway.
Edit the newly added Gateway to specify Basic Settings, Custom Fields, Config Variables and Currency Settings. After specifying these configure the Gateway.
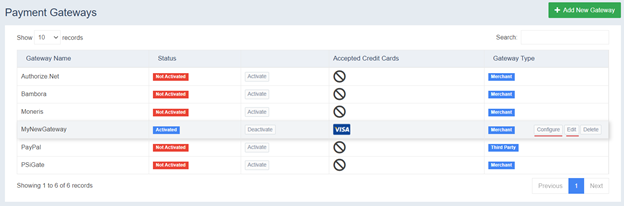
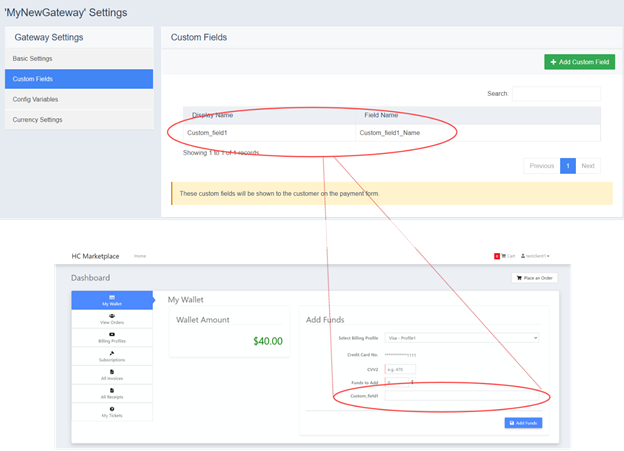
The Gateway settings include additional fields (referred to as “Custom Fields”) which will be displayed on actual payment form. Custom fields are used for asking additional information from the user while making payment.
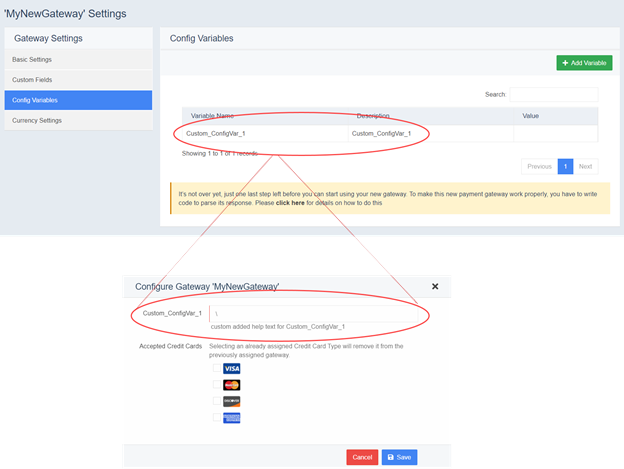
Once done, you can proceed to the next screen where you need to add Gateway configuration fields. These fields will be shown on Gateway configuration page mainly for Gateway credentials.
Part 2 (Backend Hook):
The second step is to add the backend code of the Gateway to process the payment requests. For backend-code you need to implement methods of an interface from an assembly “Marketplace.Hooks.Interfaces.dll” which is shipped with the Marketplace installation, and can be found in the “bin” directory. This assembly contains two interfaces related to payment Gateways; one each for the two types (Third-party, Merchant). Download the skeleton project as per the type of your Gateway:
Then perform the following steps to get the project ready:
- Open the downloaded project in Visual Studio 2015. It’s a class library type project.
Do not update the versions of any NuGet package already added in the skeleton project. - Add reference to the assembly “Marketplace.Hooks.Interfaces.dll” from “bin” folder in Marketplace Installation location and rebuild the project.
- To give a name to your implementation of the provided interface, open “Modules/GatewaysModule.cs” file and update the component name (encircled string) with your new Gateway name.
- Name must be exactly the same as entered on the “Add New Gateway” form in the Marketplace.
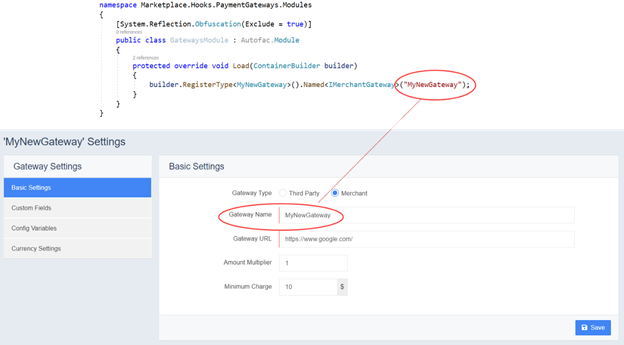
- Name must be exactly the same as entered on the “Add New Gateway” form in the Marketplace.
- Open “MyNewGateway.cs” file which implements an interface (either IMerchantGateway or IThirdPartyGateway) and add your code as per requirements.
- You can change file or class name as per your requirement.
Following is the detail of the interfaces:
1) IMerchantGateway
This interface contains only a single method and is for Merchant Gateways. It receives user billing profile, its credit card detail, Gateway credentials and other details as JSON input parameter.
|
Methods |
|
|
|
PayNow
|
Input
|
{
"CreditCardNo":" string ", . . . . |
|
|
Output
|
{ "Status":"Approved | Failed", |
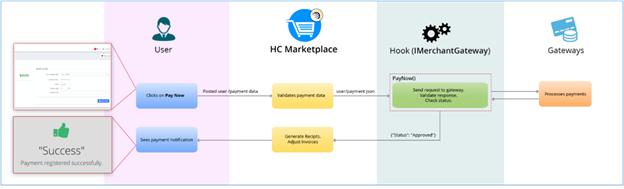
Following image shows the payment process of Merchant Gateways and role of Hook in the process.
2) IThirdPartyGateway
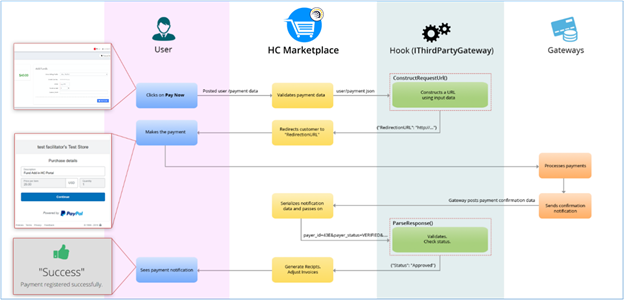
This interface has two methods; one that returns a URL which HC uses to redirect user to the Gateway’s website to make payment and, second, which receives the payment response from the Gateway after completion of payment and decides the payment status.
|
Methods |
|
|
|
ConstructRequestUrl
|
Input
|
{ "ReturnUrl":" string ", . . . . Note: “NotifyUrl and “ReturnUrl” properties contain two URL values which have to be used in the constructed “RedirectionUrl” in the appropriate URL variables (as mentioned by Gateway) e.g for PayPal …&return={ReturnUrl}¬ify_url={NotifyUrl}…. |
|
|
Output
|
{
|
|
ParseResponse
|
Input
|
Param1 Serialized string of data posted by the Gateway to our notify URL e.g. payer_id=43EDT6MZJM7L4&payer_status=VERIFIED&first_name= mark&last_name=jhon&address_name=…..
|
|
|
|
Param2 { . . . .
|
|
|
Output
|
{ |
Following image shows the payment process of Third-party Gateways and role of Hook in the process.
Once done, just build the project and place the output assembly in the “bin” directory of Marketplace. That’s it, restart Marketplace app pool and you are good to test your new integration.