
| Product Documentation
HC Marketplace
Help
Customers often need help regarding their orders. They can initiate help requests via the Marketplace ticketing system. They can raise tickets for their issues and direct them to relevant departments with the host. The trouble ticket details the exact nature of the problem the customer is facing. The Marketplace ticketing system allows a two way communication. Both host and customers can send tickets to each other. Moreover the host can run announcements for new products and promotions on the online store. The host can also maintain a repository of knowledge base articles for its customers.
To manage tickets, navigate to the left menu and then Help section. Click Client Tickets.
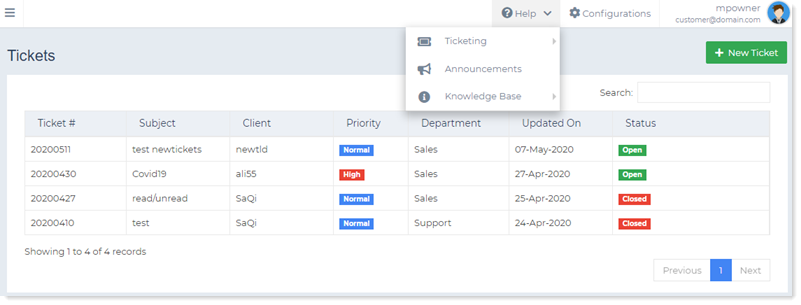
 Ticketing
The host can send a ticket to a customer or the customer can raise a trouble ticket with the host. To manage tickets, navigate to Help >> Ticketing. For tickets, navigate to Client Tickets and to manage departments, navigate to Departments.
Add New Ticket
To add a new ticket, click + New Ticket and specify following information:
- Select Department: Select department from the list.
- Send to: Select user to send the ticket to.
- Priority: Select priority from the list.
- Subject: Type subject of the ticket.
- Message Details: Type message details.
View Ticket Details
To view a ticket, place mouse over the ticket name and click View to modify information as required:
- Priority: This defines the urgency level of the ticket. Most urgent issues come with high priority. Least urgent cases are assigned a low priority. Marketplace offers three priority levels:
- High
- Normal
- Low
- Status: This defines if the ticket is still open or closed. Tickets for ongoing cases are left open while those for resolved issues are closed. The host can close or reopen a trouble ticket. When a customer raises a new ticket its status is set to new. It displays as a new ticket to the host. Marketplace displays three statuses:
- Open
- Closed
- New
- Ticket #: Every ticket is issued a unique number. Tickets are identified by these numbers.
- Subject: While initiating a ticket the host or the customer can provide a subject to the ticket. This gives the recipient a clear idea of the issue.
Close Ticket
Once the issue is resolved, it is to be closed. To close a ticket, place a mouse over the ticket name and click Close.
Delete Ticket
To remove a ticket place a mouse over the ticket name and click Delete.
Add New Department
Customers can direct their tickets to relevant departments. For example accounts related tickets can be directed to accounts department and sales related tickets can be directed to sales department. Marketplace allows the host to setup multiple departments. To add a new department, click + Add Department and specify following information:
- Department Name: Type name of the department.
- Description: Briefly describe the department.
Edit Department
To modify department information, place a mouse over the department name and click Edit.
Delete Department
To remove a department place a mouse over the department name and click Delete.
 Announcements
E-commerce store owners often need to run announcements on their online stores. They can be announcements for new arrivals, new discounts and deals or important warnings. Marketplace allows the host to display announcements on the online store. To manage announcements, navigate to Help >> Announcements.
Add New Announcement
To add a new announcement, click + Add Announcement and specify following information:
- Announcement Date: Select required date from the calendar.
- Title: Type title of the announcement.
- Announcement: Type announcement.
- Enabled: Select to enable the announcement.
Edit Announcement
To modify announcement information, place a mouse over the announcement name and click Edit.
Delete Announcement
To remove an announcement, place a mouse over the announcement name and click Delete.
 Knowledge Base
Customers may run into issues but might not want to contact their hosts directly via support tickets. They may want to read through help articles themselves. This is where a well-structured knowledge base comes into picture. A knowledge base may contain FAQs, step-by-step guides and introductory help articles for customers. Marketplace allows the hosts to maintain a repository of help articles and resources known as a knowledge base.
Add New KB Article
To add a new knowledge base article, navigate to Knowledge Base >> KB Articles and click + New Article. Specify following information:
- Select Category: Select required category from the list.
- Article Title: Type title of the article.
- Article Body: Type article content.
Edit KB Article
To modify any of the knowledge base article, place a mouse over the article name and click Edit.
Delete KB Article
To remove any of the knowledge base article, place a mouse over the article name and click Delete.
Add New Category
To add a new category, navigate to Knowledge Base >> Categories and click + Add Category. Specify following information:
- Category Name: Type name of the category.
- Description: Type category description.
Edit Category
To modify any of the category, place a mouse over the category name and click Edit.
Delete Category
To remove any of the category, place a mouse over the category name and click Delete.